To show index frame
Absolute Sweet Cindy
Soft cloth doll
Free pattern and instructions!
< Prev.    To the top.    Next >
This page have been already translated manually.

Materials, tools, and pattern

   Gathering materials and tools, and print out pattern sheets.

Materials

Common

  1. 30 pieces of letter size drawing paper (for pattern)
       When you can not get letter size drawing paper, get larger one and cut them into letter size. It is enough in a cheap drawing paper (ex. for the school children). However, too thin one doesn't fit for the pattern.
  2. 3 yard of cotton sheeting cloth (natural colored)
  3. 1.5 yard of Cotton jersey cloth (natural colored)
  4. Sewing thread(matches the fabric / ex. Dual duty etc...)

Body

  1. approx. 700 gram of Polyester fiberfill (i.e. Poly-fil or better one).
    This is the most important material.
    Use excellent one having much resilience and spread ability.
    In Japan, we can get "TUBUWATA" which is the gathering of the bead (about 1/4") made from the Poly fiber. It is one of recommended one. Dupont Comforel filling is one of recommend one too. (so expensive)

Head

  1. Sewing thread(to attach eyes. i.e. button thread)
  2. 2 1/2" round buttons. (for eyes)
    Choose your favorite color.
    Glossy buttons make eyes freshly.
    Flat face button is recommended.(I use it in this instructions.)
  3. Liquid fray stopper
    (Use water-proof one like "Peque". Alcoholic solution of Nylon.)
  4. 6 balls of hand knitting cotton yarn. (40 gram/ball)
    For hair. Prefer your favorite color.
    A glossy yarn is preferable.

Dress

  1. 2 yard of Cotton Sheeting.
    Prefer your favorite color.
    I used pale brown colored one in this instructions.
  2. Braided elastic. (4 cord)
  3. 10" of zipper. (scissors cut-able)
  4. Cotton lace. (a little)

Tool

  1. Water soluble marker
  2. Scissors
  3. Sewing needle
  4. 3 inch (or longer) doll maker's needle
  5. Pin
  6. Chopstick
  7. Sewing machine
  8. Thumbtack
  9. Corrugated paper sheet (used for carton box)
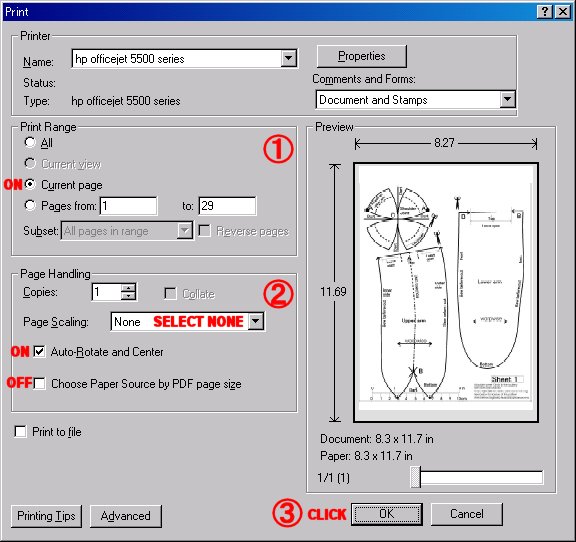
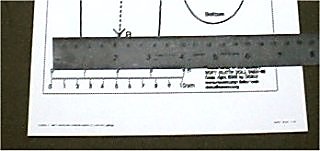
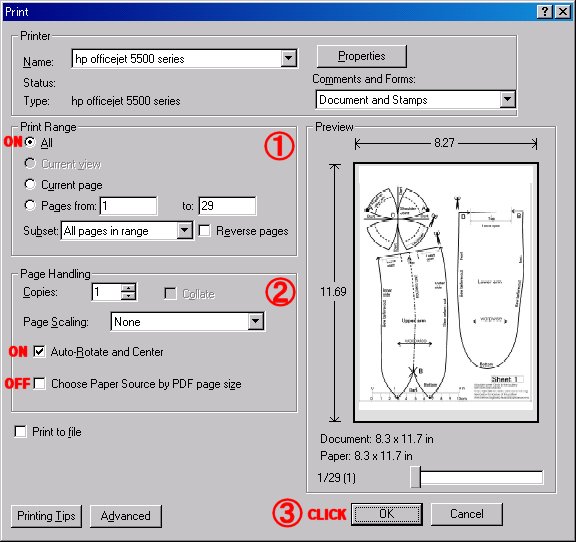
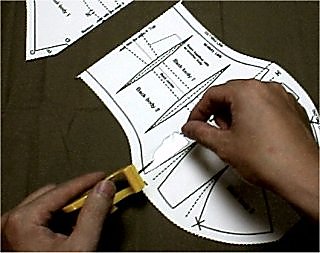
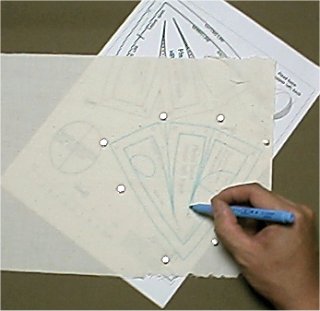
The corrugated paper sheet and the thumbtack are used to fix the pattern on the fabric to trace the lines on pattern on the fabric.
By this method, we can trace pattern with notably materials, but it is disadvantageous in that in some case the pattern shifts on the fabric, Also, patterns are damaged by thumbtack.
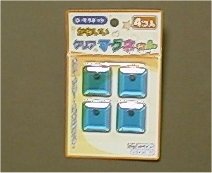
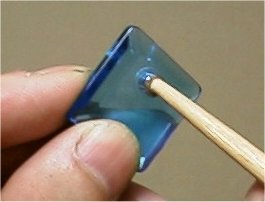
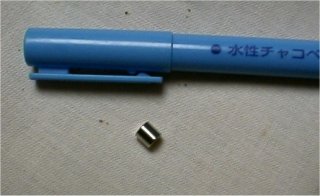
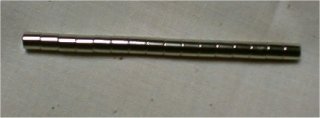
So, to be described, using magnets to fix the pattern on the fabric, we can trace them with ease.(From what I've heard, using a commodity called "Magic weight" we can also do it with ease. But I can't get it in Japan.)

Attention

  1. When you print out this instructions, CLICK HERE and display the page without frame before you print.
  2. It is a good idea to read all the instructions here and on the pattern before beginning your work.
  3. A water soluble marker is used for most marking. so "marker" means water soluble marker in this instructions.
  4. When you are stuffing, Comparing the softness of stuffing one and already stuffed one, make the softness of them alike.
  5. Sew a ladder stitch to close openings of stuffed parts, turning seam allowance of opening inside.

Preparing pattern pieces

The pattern is provided in two formats. Prefer your favorite one.

1st Format (PDF file)

Feature

This is a recommended format. The pattern is displayed and printed with the PDF format (Adobe acrobat format).
Since all patterns are downloaded in single file, all patterns can be printed by one operation.
Also, in many case, pattern is printed in correct size.
To print out PDF format pattern, the software called Acrobat Reader is necessary. But most personal computers have this software from the beginning.
When your personal computer do not have it, you can get it by clicking the icon below.
Acrobat Reader Acrobat Reader is necessary for display PDF files.
Please download it from here. When Cindy's pattern is not displayed on your display.

Downloading patterns

Since the PDF formated file includes all patterns for Sweet Cindy, In some case, it takes a long time to download the file. Please wait for a while after clicking the link below. Patterns are displayed in another window.
Download and Display all patterns for Sweet Cindy
(About 3MB)

When you can't download PDF file above. Please try to download "ZIP compressed PDF file" below. Right click below link and select "save target to file" on the shortcut menu to save it on the desktop of your computer. After you download "cindy_jp.exe", double click it to get cindy_jp.PDF file. Double click cindy_jp.PDF file on your desktop or explorer to show patterns and print them.
Right click here and choose "save target" to download patterns for Sweet Cindy
(About 3MB)
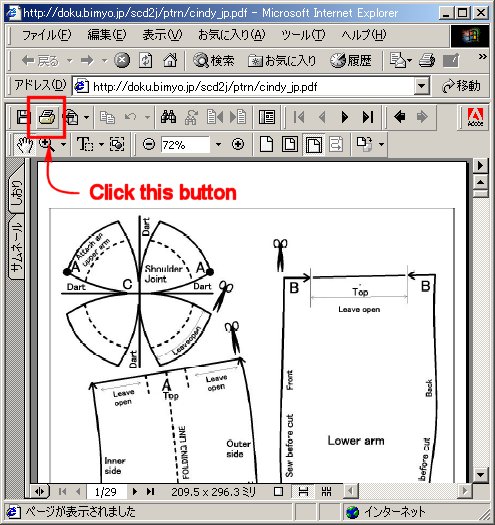
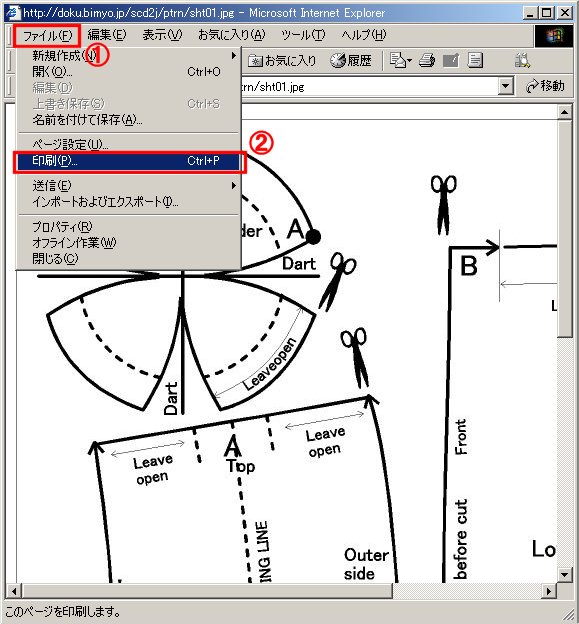
If you can not get pattern to click above link, please get them using below URL. (Key in below URL to the address box of your browser and push enter key.)
http://doku.bimyo.jp/scd2/ptrn/cindy_jp.pdf

Confirming the size of patterns

After a while, Patterns are displayed in another window.
First of all, Print one of patterns on the cheap plain paper to confirm the size.
Click the print icon.
Click the print button (shown in the red frame in above picture).

Setting print dialog box
A dialog box as shown in above is displaied. Set letter size plain paper (not drawing paper yet) your printer. Click controls on the dialog box below as shown in the picture above.
  1. ON the "Current page" check box.
  2. Select "None" in the "Page Setting" box.
    ON the "Auto-Rotate and Center" check box.
    OFF the "Chose Paper Source by PDF page size" check box.
  3. Click OK button.

Confirming size of patterns

Confirm that patterns are printed in full proportion.
applying a ruler
A scale is marked on the foot of the page, so you can see the patterns are in full proportion or not. In many case you can get the correct printing. But some case, the pattern may print a little small or large depending on your computer setting. This case, set up your printer to print in full proportion using the printer properties dialog box. this dialog box is shown to click "properties" button in print dialog box in above picture. Alternatively, you can enlarge or reduce the size by using a photocopier.

Printing out patterns

After you confirm the size of patterns, print all 29 pages on the letter sized drawing paper, as shown below.

Click print button.
Click the print button shown with a red frame.

Print setting
Setting for print out in daialog box
A dialog box as shown in above is displaied. Set letter size plain paper (not drawing paper yet) in your printer. Click controls on the dialog box below as shown in the picture above.
  1. ON the "All" check box.
  2. Select "None" in the "Page Setting" box.
    ON the "Auto-Rotate and Center" check box.
    OFF the "Chose Paper Source by PDF page size" check box.
  3. Click OK button.

2nd Fromat(JPEG image file)

Feature

This format cannot be recommended so much. In this method, you can display the pattern on your browser with ease, but in many case the size of printed patterns are not correct. Also, since only one page can be shown and print at one time, you have to print numerous times to get all patterns.

Displaying a pattern page

Clicking the link below (ex. "Arm") display the pattern page on another window of your browser.

Pattern for body

  1. Arms
  2. Cover for arms
  3. Thigh
  4. Legs
  5. Upper front body
  6. Lower front body 1
  7. Lower front body 2
  8. Back body 1
  9. Back body 2
  10. Back body 3
  11. Body cover 1
  12. Body cover 2
  13. Body cover 3
  14. Body cover 4
  15. Body cover 5
  16. Body cover 6

Pattern page for head

  1. Markers
  2. Left front
  3. Rght front
  4. Left back
  5. Right back
  6. Face cover
  7. Neck

Pattern page of dress

  1. Front bodice
  2. Back bodice
  3. Sleeve 1
  4. Sleeve 2
There is no pattern of the skirt. Cut a square fabric for skirt.

Additional patterns

If you prefer, use these patterns.
  1. Hand with finger
  2. Leg without foot

Confirming the size of patterns

Pattern pages are printed to use the print function of your browser.
Selecting print menu
On the menueber, click file - print menu item.
Print setting dialogbox will be displayed.
Print setting dialog box
Set letter size plain paper (not drawing paper yet) your printer. Clicking the print button shown in figure with a red frame, print a piece of pattern page.

Confirmation of size

Confirm that patterns are printed in full proportion.
applying a ruler.
A scale is marked on the foot of the page, so you can see the patterns are in full proportion or not. In some case you can get the correct printing. But many case, the pattern may print a little small or large depending on your computer setting. This case, setting up your printer to print in full proportion using the printer properties dialog box. Or else, you can enlarge or reduce the size by using a photocopier.

Printing out pattern pages

After you confirm the size of patterns, continueing click the link (ex. Arms) and print it for all pattern pages, print all 29 pages on the letter sized drawing paper.

Cutting pattern pieces

Cut out pattern pieces from the pattern pages, The lines to cut along are shown by marks of scissors on the pages.

Taping patterns

To fit the patterns on a letter size page, Some pattern pieces are split between two or three pages.
Taping
Tape split pieces together.
Tape patterns shown in below pictures.
Arm cover
Foot
Lower front body
Back body
Body cover
Sleeve (for dress)

Additional information


To trace lines on patterns with ease

To sew Sweet Cindy (or original Cindy), It is necessary to mark not only edges of pattern but also lines on the pattern on the fabric to sew correctly. In this instructions, I use corrugated paper sheet and the thumbtack to fix pattern pieces on the fabric. But described above this method have some issue. Then useing magnets to fix pattern pieces on the fabric, we can trace them with ease without any issue. I think this method can be applyed for many other fabric crafts.

At first, get the small and strong magnets.
Magnet in shops
neodymium magnet is recommended
In the shop, find the magnet including neodymium.
Push and remove the magnet.
Removed small magnet
Removed magnets

Put a tin sheet on the desk
Fix pattern on the fabric with the magnets
can trace with ease

About the basting

In this instructions, in many case, I sew with sewing machine directly over the pins, to work quickly. But by this way, the seam becomes a little staggering. Also, some case the needle of sewing machine is damaged by the pin. We can prevent this issue by basting. For that reason, when orderly stitches are required, I use basting in this instruction. Needless to say, if you have ample time to sew Cindy, you may use basting for every seam, to stitch perfectly.
    Links of these pages are free. The banner below is also good and use it, please.

    About DOKU

      Mail(doku@newon.org)

      "DOKU" doesn't mean the doctor. "DOKU" originates in Japanese word "DOKUTOKU". Moreover, it means unique and the original.