Abstemious little Cindy in the scullery
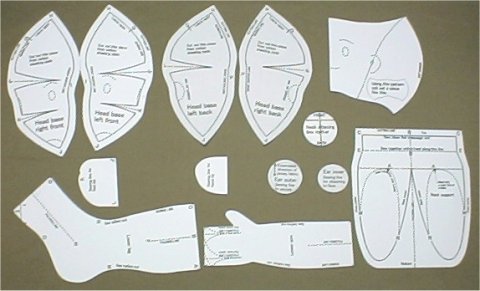
Optional Pattern and Instructions

Back to entrance page

In order to show the detailed way of making, this page is rather large. Some case, it takes time in loading. Please wait for a while.

Introduction

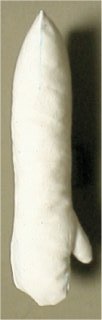
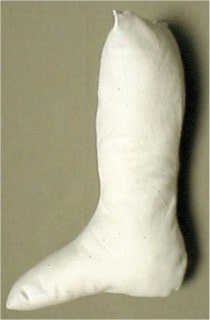
To my joy, as soon as I opened Cindy's page, I received many emails. Thank you for your email. Most of them were written about Cindy's cloth made head. Reading them, I thought it is hard to get the plastic head. And many people want to make a fully cloth made doll. So I try to write instructions about it.

One of my friend said "A doll without hands, feet and fingers looks strange". I really didn't think so. But I remembered that many dolls have them. Although they will spoil holding feeling of Cindy, I think I need to try to make them.

Cloth head (with doll wig)
In this instructions, I use red-thread in order to explain how to sew, so sewing-lines on the face and neck are conspicuous in the picture. But in fact, they aren't so.
Hand with thumb
Cloth head (with doll wig)
Foot

Materials and tools

Materials

Common

  1. 8 piece of letter size Kent paper
  2. 1 yard of natural colored cotton sheeting
  3. Sewing thread (matches the fabric)

For the head

  1. Less than 1/4 yard of natural colored cotton jersey
  2. Tough thread (For attaching eyes. ex. button thread)
  3. Polyester fiberfill
    You can stuff cheap or leftover fiber for the head, neck and ear.
    Since head is stuffed firmly, quality of filling does not affect feeling. Especially in ears, they don't become flat unless using cheap filling.
  4. Two round button 1/2" dia. (for eyes. prefer your favorite color.)
    glossy buttons shows eyes freshly.
  5. Fray stopper (If you have) or glue.
  6. A doll Wig for 14" to 15" doll heads

For the hands and feet

  1. Polyester fiberfill
    i.e. Poly-fil or better one
    Use excellent one having much resilience and spread ability.

Tools

  1. Water soluble marker
  2. Oily marker (orange and brown, for eyebrows and a mouth)
  3. Sewing needle
  4. 3 inch doll maker's needle
  5. Drawing pin
  6. Pin
  7. Clip or tweezers or Chopstick
  8. Sewing machine

Printing pattern sheets

Click on links below to view pattern sheet and print directly from the web.

For the cloth head

  1. Head base right front
  2. Head base left front
  3. Head base right back
  4. Head base left back
  5. Face cover
  6. Neck

For the hands

  1. Hands

For the feet

  1. Feet
About the license of Cindy's pattern and instruction.

Cutting out patterns

Patterns for optional patrs
Cut out pattern pieces from the pattern sheets, The lines to cut along are shown by marks of scissors on the sheets.

Note

  1. If you print out this instructions, CLICK HERE and display the page without frame before you print.
  2. Set the stitch length on your sewing machine for the tiniest stitch.
  3. You can stuff cheap or leftover fiber in the neck, ears and head. Because It does not affect feeling.

Cloth head

A cloth head is consist of 4 type of pieces. head base, face cover, neck and ear. The face cover and ears are made from cotton jersey, and other pieces are made from cotton sheeting. Since the form of the face is so delicate, mark and sew correctly just on the line. I think people except me are good at it.

Head base

Cutting out

A head base is consist of 4 pieces, right front, left front, right back and left back.
Marking fringe
Place one of head base patterns on the cotton sheeting fabric and draw around with a marker to mark fringe. This is right side.
Cutting out
Cut just along the line.

Mark on the right side

Marking on the right side
On the corrugated paper sheet, place the fabric head base piece on the pattern, matching each edges. Stab the drawing-pins aslant and half of needle. Trace all lines on the fabric.

Mark on the wrong side

Marking on the wrong side
Put the pattern for another side on the corrugated paper. For example if you cut "head base RIGHT front" piece, use "head base LEFT font" pattern here. Turn over the fabric head piece, and place it on the pattern. Stab the drawing-pins and trace the all lines on the fabric. Repeat those process for four head base patterns. (right front, left front, right back, left back)

Sew front pieces

Sewn center line
Place right front and left pieces, right side together, matching each front center line (H-I-J). Pin and sew correctly along the center line (H-I-J).
Sewn four darts
Pin and sew four darts (K,K,L and L).

Sew back pieces

Sewn center line
Place right back and left pieces, right side together, matching each back center line (H-P-J). Pin and sew correctly along the center line (H-P-J).
sewn two darts
Pin and sew two darts (L and L).

Sew front and back together

Matching right side line
Place the front and back face piece together right side facing. Carefully matching each darts (L) and sewing lines (H-G-L-J-L-G-H) draw on the right side, pin and sew (G-L-J-L-G) them leaving open shown on the pattern.
Sewn front and back pieces

Stuff and close opening

Turn right side out and stuff as firmly as you can.
Sewing ladder stitch
Pull and close
Sew and close opening using ladder stitch.
Stuffed head base

Face cover

Cut out

Marking
At first, place face cover pattern on the cotton jersey fabric and draw around with a marker to mark fringe.
Marking
Then turn the pattern over, and place it again, matching the center line (X-Y) together. And draw around. Thus you've got the whole shape on the fabric. This is the sewing line.
Cut out
Cut out leaving 1/4" seam allowance.

Sew

Sewn face cover
Fold the face cover in the center line (X-Y) right side facing. Sew along back head line (X-Y-Z). Turn right side out.

Neck

Cutting out

Marking
Place pattern pieces on fabric and draw around with marker to mark fringe.
Cutting
Cut along the marked line.
Tracing both side
On the corrugated paper sheet, place the fabric neck piece on the pattern, matching each edges. Stab the drawing-pins aslant and half of needle. Trace all lines on the fabric.
Remove drawing pin and turn the fabric over on the pattern, matching the edges and pin again. Trace all lines on the pattern.
Folding and sewing
Fold the center line right sides facing, sew the bottom line around.
Stjffed neck
Turn right side out and stuff as firmly as you can.
Stitched neck
Gathering stitch around the top line (C-B).
Secureing
Tie one end of the thread to something heavy (ex. sewing machine). Pushing seam allowance inside, secure the thread to close opening and tie.
Finished neck

Assembling

Cover the face

Covering head base
Covered head base
Opening top of face cover, and pushing bottom of head base into top of face cover, cover the head base with face cover.
Bottom opening
Top opening
Secured face cover
Gathering stitch around the top and bottom opening of the face cover. Secure the thread, and fit the face cover to the head base, Not to make wrinkles. Openings are not closed completely. So the open portion remains as shown in the picture above.
Since the bottom-opening have to be hidden by neck, Place it as shown in the picture. (In the picture above, The face is turned to the top.)
Covered head

Tracing facial features
Trace facial features (eyes, ears and mouth) drawn on the head base on the face cover with a marker.

Attach the neck to the head

Tracing seam line
Trace seam lines of the bottom of head (where neck is attached) on the head cover with a marker.

Marking with a pattern
Place the "Neck attaching line marker" pattern on the bottom of head, matching marked lines and lines on the pattern together. And draw around the pattern to mark a round sewing line, where the neck will be attached.

Sew neck and head together
Matching each front and back seam line, sew D-E line of neck to the marked round line on the bottom of the head, using ladder stitch. After sewn around, secure enough. Make two small stitch and tie off.
Sewn neck and head

Sewing around opening
Sewing together face cover and head base fabric, stitch around the opening on the top of head.
Cutting excess fabric
After sew around, cut excess fabric of head opening.
Finished opening

Ears

Cut cotton jersey fabric to measure 4" by 4". Put the square piece, Making expandable direction of jersey vertically.
Marking
Place ear outer pattern on the center of the fabric and draw around with marker to mark fringe. This is sewing line to secure ear.
Marking
Place ear inner pattern on the fabric, matching right edge of pattern with the right of drawn (ear outer) line. Draw around with marker to mark fringe. This is sewing line to attach the ear to the head.
Marked fabric
Right of fabric is front side of ear, and left is back side.
Marked fabric
Using tough thread (ex. button thread), Gathering stitch along the ear outer line. And prepare fiber ball to measure 3"of diameter.
Secureing
Tie one end of the thread to something heavy (ex. sewing machine). Pull and secure the thread, pushing fiber into the ear. and tie.
Placing the expandable direction of jersey horizontally, flatten the ear with fingers,
Pushing with fingers

A flattened ear

Making two small stitch
Make two small stitch at the bottom of ear inner line.
Starting ladder stitch
Start ladder stitch from bottom of "ear attaching line" on the head.
Ladder stitching front of ear.
Sewn front line.
Continue ladder stitch along the front portion of ear attaching line. After you sew to top of ear, secure the thread and continue ladder stitch back of ear.
Continuing ladder stitch
Ladder stitching
Secureing thread
Continue ladder stitch back of ear to the bottom. At the bottom, secure the thread and make two small stitch and tie off.
Attached ears

Eyes

Double the tough thread (ex. button thread) and pass it through a button. Thread a 3" doll maker's needle with the four threads.
Stab the needle from the center of eye to back-head, in parallel to median plane, a little going up as shown in the picture above.
Pushing the needle
Pushing needle with your thumb very very slowly, exit it at back head. Be so careful not to stab your finger with the needle.
Passed thread
Thus the thread goes from eye to the back head as shown above. Work another eye alike.
Thread in back head
Each threads which come from eyes are appear as shown in above picture in the back-head.
Secureing
Tie one end of the thread to something heavy (ex. sewing machine). Pull and Securing the thread, hollow an eye a little. At this time the back head is also hollowed. In order to don't make her face become funny, Don't pull so strongly.
Tieing
Pressing knot with a finger, keep secureing the thread, tie the thread. Cut the excess part of thread.
Working fray stopper
If you have, work a fray stopper on the knot. You can use ordinary glue here.
Attached eyes

Drawing a mouth and eyebrows


Looking from various directions, confirm that you are pleased enough for the form and position of eyebrows and a mouth.
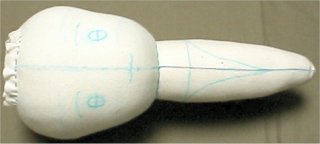
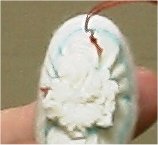
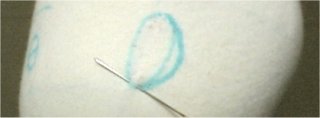
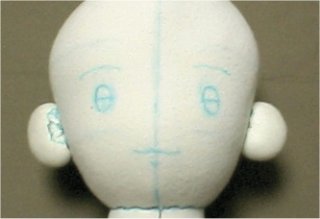
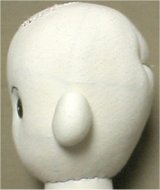
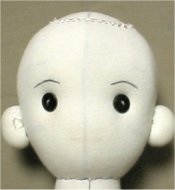
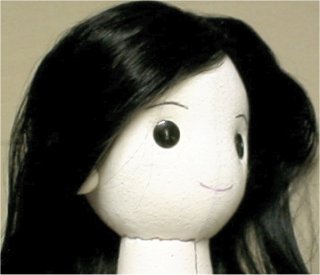
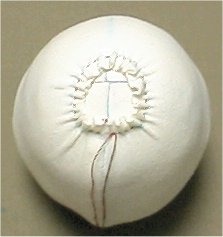
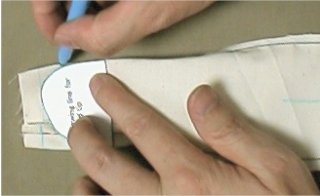
If not, Erase and re-draw them with water soluble marker.
To erase, press lightly with wet cloth. (Don't rub.) and re-draw them after well dried. Do not make it dry by drier etc. Because some water soluble marker may become non-soluble by the heat.
Trace eyebrows with brown, mouth with orange oily marker.
A mouth and eyebrows are drawn

Attach the head to the body

Attach this head to the body, referring Attaching each bodies and neck support above-mentioned.

Erase marked line

Press lightly with wet cloth (Don't rub.) on the marked line of head and neck to erase marked lines. And let dry well.

Attach a wig

Attach a wig on the head using a both side adhesive tape or adhesive Velcro.

Hands

Cutting out

Marking
Place pattern pieces on double layer of fabric and draw around with marker to mark fringe. This is first marked side.
Sewn side lines
Pin and sew directly along the side line which shown in bold line on the pattern.
Marking
Turn the fabric over and place turned pattern on unmarked side. Matching edges of the pattern to the sewn lines of fabric. And mark two lines (A-B-C and D-E). This is second marked side.
Marking folding lines
Mark three folding lines (B-F H-D G-E) by eye measure.
Cutting out
Cut out leaving a 1/4" seam allowance.

Sewing hand tip

Open the bottom end (Finger side). Fold H-D line on First maked side, and G-E line on Second marked side. Thus the thumb is shift to palm-side a little.
Marking finger tip
Place the hand tip pattern on the hand fabric, matching finger tip (K) to the sewing line (D-E). Mark finger tip line (J-K-L)
Sewn finger tip
Pin and sew just along the marked line.
Clip seam allowance
Clip the seam allowance at M, N and O. Be careful not to cut the thread.

Sewing top end

Pin and sew top end
Open the top end, and fold them in the line which labeled "FOLDING LINE" (B-F) on the pattern. Sew each side of top end approx. 1/4".

Stuffing

Turn right side through the opening, Using a chopstick to turn the corners in the top ends.
Here I stuff thumb using a clip which was a doctor's tool from the first but is familiar to handcraft-people recently, It is one of the best tool to turn fabric and to stuff. But you can stuff using a chopstick, tweezers etc... which you have.
Pinching fiber
Pinch small amount of fiber with clip or tweezers.
Stuffing thumb
Insert clip tip into thumb, and release it to stuff fiber.
Lightly stuff other portion.
Ladder stitching
Pulling and securing
Turn in the seam allowance and sew a ladder stitch to close the opening.
Finished hand

Sew more one hand

Sewing way of other side of hand is alike already sewn one. But when you sew the hand tip, fold H-D line on SECOND marked side, and G-E line on FIRST marked side.

Attach hands to the upper arms

Attach these hands to the upper arms, referring Attaching arms above-mentioned.

Feet

Cutting out

Marking
Place pattern pieces on double layer of fabric and draw around with marker to mark fringe.
Sewn side lines
Pin and sew directly along the side line which shown in bold line on the pattern.
Marking
Turn the fabric over and place turned pattern on unmarked side. Matching edges of the pattern to the sewn lines of fabric. And mark two lines (A-B-C and D-E).
Cutting out
Cut out leaving a 1/4" seam allowance.
Marking folding lines
Mark two folding lines (B-F H-G) by eye measure.

Sewing foot tip

Open the bottom end (Finger side) And fold H-G line on both pieces.
Marking finger tip
Place the foot tip pattern on the foot fabric, matching foot tip (K) to the sewing line (D-E). Mark finger tip line (J-K-L)
Sewn finger tip
Pin and sew just along the marked line.
Cut foot tip fabric leaving 1/4 seam allowance. Clip the seam allowance at K, M, N and O. Be careful not to cut the thread.

Sewing top end

Pin and sew top end
Open the top end, and fold them in the line which labeled "FOLDING LINE" (B-F) on the pattern. Sew each side of top end approx. 1/4".

Stuffing

Turn right side through the opening, Using a chopstick to turn the corners in the top ends. Lightly stuff.

Ladder stitching
Pulling and securing
Turn in the seam allowance and sew a ladder stitch to close the opening.
Finished foot

Sew more one foot

Sewing way of other side of foot is alike already sewn one. But mark the foot tip line using reversed pattern.

Attach feet to the upper legs

Attach these feet to the upper legs, referring Attaching arms above-mentioned.
    If you like, you can place a link to this page. Use button picture below.

    About DOKU

      EMAIL (doku@newon.org)

      The "DOKU" does not mean a doctor. "DOKU" originates in the Japanese word "DOKUTOKU", and it means unique and original.
      These pages are originally written in Japanese, and translated into English. Original Japanese pages are here.