To show index frame
Absolute Sweet Cindy
Soft cloth doll
Free pattern and instructions!
< Prev.    To the top.    Next >
This page have benn already translated manually.

Dress

Here, we sew a dress for Sweet Cindy. A Dress is much easier to make a doll. Take it easy. Before you begin, Set the stitch length on your sewing machine for themedium stitch.

Cutting out

Cut out six pieces for a dress. One skirt and front bodice piece, Two sleeve and back bodice pieces.

Skirt

There is no pattern for the skirt. Cut a piece that measure 15" by 50".

Back Bodice

Marking back bodice
Place pattern pieces on the fabric and draw around with marker to mark fringe. Turn over the pattern and mark more one fringe. Cut out it leaving 1/4" sewing allowance.

Sleeve and Front bodice

Read the instructions on the patterns to see the whole shape of the pieces. These patterns have only half shape of the fabric pieces. So you need to mark twice.
Marking front bodice
Marking sleeve
At first, Mark around the pattern on the fabric alike before. Turn the pattern over and place it again, matching the center line together. And draw around. Thus you've got the whole shape on the fabric. Mark gather line and elastic line J-K-J on sleeves. Then cut out leaving 1/4" sewing allowance. Make one front bodices and two sleeve pieces.
Cut pieces

Sewing up

Bodice

Attach a zipper to the bodice
Attach a zipper on the D-E line of the back bodice. (Attach a zipper though it is written to attach a Vercro on the pattern. And attach a zipper to the top end to bottom end of the bodice though it is written to attach only upper portion of the bodice on the pattern. sorry...)
Sewing shoulder line
In this picture, zipper is not attached
Sew a front bodice and two back bodices along each shoulder line A-B, right side facing.
Hemming the lace
Cut the lace (2" width) to the length of the neck adding hemming allowance. And hem both ends.
Sew the lace
Turn and sewing again
Sew the lace to right side of bodice around the neck line (D-A-A-D). Turn and pull the lace flat, Press seams toward the bodice and sew around again.

Sleeves

Sewing the lace
Turning and sewing again
Sew the lace to the right side of cuff. Turning and pulling flat them, Press seams toward the sleeve, and sew the cuff again.
sewing the elastic
Pulling and lengthening the elastic, sew it to the sleeves along the J-K-J lines.

Setting sleeves

sewing the sleeve
Gather the sleeve as shown in the pattern, And pin and sew to the bodice right sides facing.

Closing bodice and sleeves

sewing the sleeve and side of bodice
Pin the side line of the front bodice and the back bodice (C-D), And Pin the bottom lines of the sleeve (C-H) Right side facing. Sew them at once along the H-C-D line.

Skirt

Hem the bottom edge of the skirt. Folding skirt fabric wrong side out sew back line of it.
Close a zipper at the back of the bodice. Turn the bodice right side out. (skirt is wrong side out yet.)
Sewing skirt and bodice together
Evenly gathering the skirt, Pin and Sew the bottom edge of bodice and top edge of skirt right sides facing. (The rightside out bodice is in the gathered wrong side out skirt.)
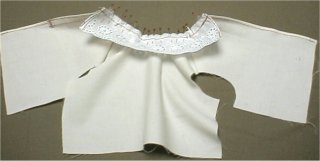
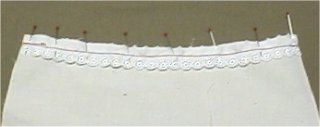
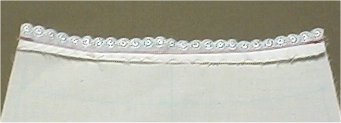
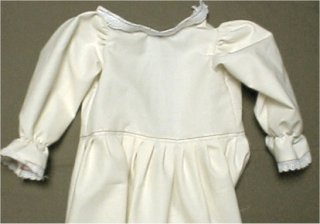
How to gather evenly.
  1. Pin-A and B both ends.
  2. Making similar slacks, Pin-C the center of A and B.
  3. Making similar slacks, Pin-D the center of A and C.
  4. Making similar slacks, Pin-E the center of C and B.
  5. Repeat this process until you get pleasing gather.

Sewing bottom of bodice
Pull bodice and skirt to flat them. Press seams toward the bodice, andsew the bottom of bodice.

Dressing

Dressing
Dress on the Cindy. And fasten Zipper at the back.
Completed.

Congratulations. Your Sweet Cindy have been completed.


    If you like, you can place a link to this page. Use button picture below.

    About DOKU

      EMAIL (doku@newon.org)

      The "DOKU" does not mean a doctor. "DOKU" originates in the Japanese word "DOKUTOKU", and it means unique and original.
      These pages are originally written in Japanese, and translated into English. Original Japanese pages are here.