Abstemious little Cindy in the scullery
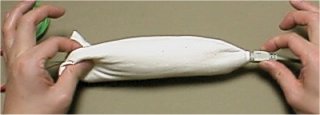
How to make a warming body


In order to show the detailed way of making, this page is rather large. Some case, it takes time in loading. Please wait for a while till page and pattern are shown.

Introduction


Warming-Cindy having electric heater
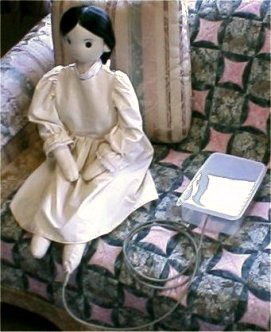
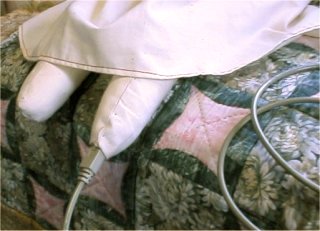
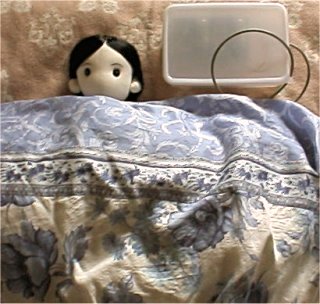
Please imagine how you would feel... When you hold a soft cloth doll having natural warmth. Probably, many people will think that this type of gimmick for a doll is uncanny. However, some doll therapists are saying that they need warming doll. Moreover, since a feeling of warming doll is so peaceful, if once you hold the doll, your negative prejudice disappears from your mind, and you can understand the value of the doll. I think this gimmick (simply warming) is more refined one than a gimmick of some dog toy having gear, motor and micro-computer(for An imitation intelligence).
I have reported about various experiments to make this kind of doll in another page. However, they needed so special technology (even a RISK processor have to be coded). So those pages were not helpful for the people who want to make warming doll. Therefore I decided to describe detailed instruction for the way to make a doll warm on the Cindy's page.
About this theme, I have already tackled for two years or more, and tried many methods. Here, I introduce the the easiest and durable way in them.
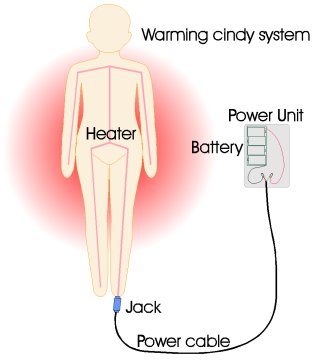
In order to simplify structure, she does not perform temperature-control, but always generates only 8W of heat. For this reason, she takes about an hour to stabilize temperature. Moreover, she is felt warmly only in the keeping-warm environment such as bedding etc. In spite of this, this Warming-Cindy makes you experience peacefulness you have never felt before.
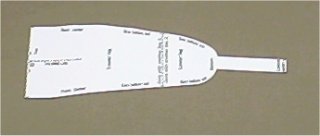
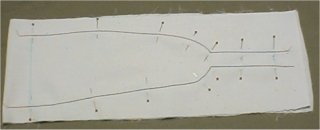
Summary

Warm Cindy's structure


Warming-Cindy system
Like an electric blanket, Warming-Cindy is supplied electric power using power cable, connected to the plug at the tip of her foot. Since the cable can be removed from the foot and then the plug is hidden in the foot, Warming-Cindy can also use as an ordinary doll.
Another end of a power cable is connected to the external power supply. The power supply is using batteries for the safety. batteries can operate about overnight.

How to make Warming-Cindy

The Warming-Cindy is made in the following process based on the ordinary Cindy. (How to make ordinary Cindy) If your purpose is the "warming" Cindy from the beginning, the left shin and the shoulder joint can be made more easily to follow the instructions described here.
  1. Strip the telephone cable and take out the heater.
  2. Built a left shin includes the power plug.
  3. Modify shoulder joints to make a heater can be passed through.
  4. Make a long bodkin to pass the heater through her body.
  5. Pass four heaters through her body.
  6. Connect four heaters serially.
  7. Measureing the resistance of a heater, decide the number of the batteries.
  8. Connect the power supply.
  9. Check the operation.
Materials and tools

Material

Handicraft shop

  1. Natural colored cotton sheeting cloth(a little)
  2. Natural colored sewing thread

Stationery shop

  1. a piece of letter size Kent paper
    What is Kent paper ?
    Kent paper is...
    - As thick as a postcard
    - Can pass your printer
    - You can use any paper like above

DIY shop or electrical appliance shop

  1. Telephone Patch Cable(4-wire 20 ft)

  2. Closed-end connector(10pcs, Crimp on type, for 12-10 AWG)

  3. THERMAL FUSE(90-105 degree C)
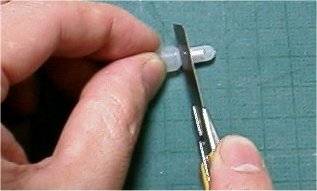
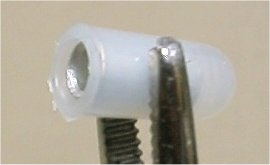
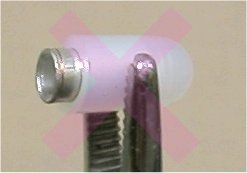
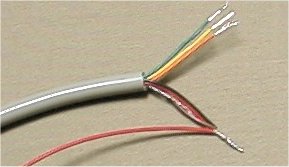
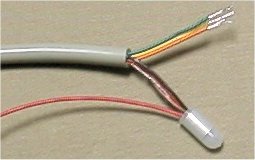
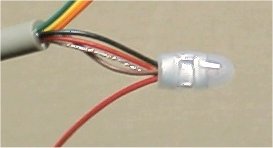
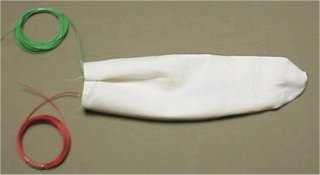
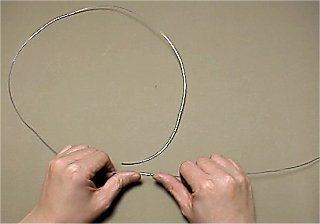
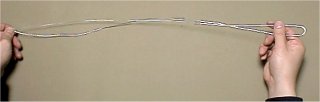
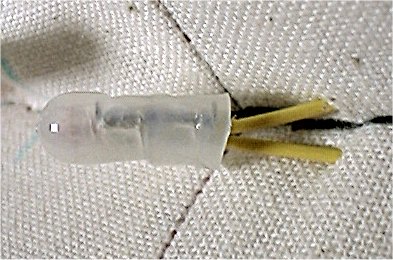
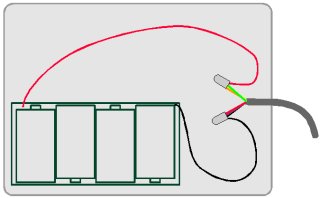
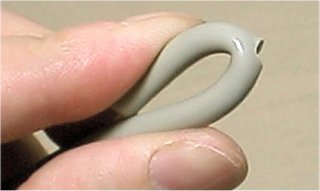
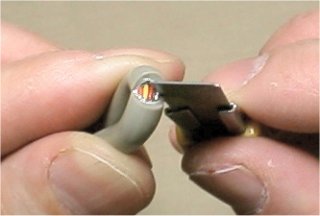
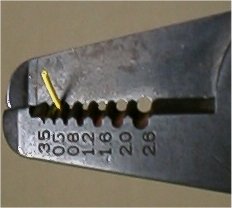
    One-time use thermal fuse used in hair dryers, coffee makers and other small appliances. about 1/2" long.(Ex. Microtemp # 4194F)

  4. Electrical tape(Insulation tape)

  5. Steel wire(3 ft, AWG18 to 19)

  6. Battery holder(for D-cells, with leading wire)


  7. Mounting Tape(double-stick foam tape, about 1/2" width Ex. Scotch Heavy Duty Mounting Tape)

PC Shop

  1. One PS/2 Keyboard/Mouse Extension Cable(about 6 ft)

Tools

  1. Seam Ripper

  2. Scissors

  3. Awl

  4. Snap-off blade cutter

  5. Long Nose Pliers(with Side Cutter)

  6. Wire Stripper


  7. Crimper(insulated terminals can be crimped)


  8. Multimeter(cheap one can be used)

Note

  1. Important warning: Electric current is flowing inside of the body of a doll available in this page. For this reason, an electric shock, a burn, ignition, etc. may occur, and this produces fatal results, such as a burn, heart failure, and a fire. Please use all the information on this page by your own accountability. Doku is not liable for any special, indirect or consequential damages, whether negligence or other tortious action, arising out of or in connection with the use or performance of information available in this page.
  2. It is a good idea to read all the instructions here and on the pattern before beginning your work.
  3. If you print out this instructions, CLICK HERE and display the page without frame before you print.
  4. A water soluble marker is used for most marking. so "marker" means water soluble marker here.
  5. When you are stuffing, Comparing the softness of stuffing one and already stuffed one, make the softness of them alike.
  6. Sew a ladder stitch to close openings of stuffed parts, turning seam allowance of opening inside.
  7. In this instructions, I used red thread in order to explain how to make, so that sewn line can be seen clearly. Of course you need not do so. use the thread matches the fabric.
Heater

About heater

Since the arms and legs of a doll are sometimes pulled strongly, common heater wire will be disconnected. For this reason, it is necessary to use an especially tough heater wire. Therefore, I use telephone cable as a heater. Because copper wire in the telephone wire is reinforced with the nylon fiber, it is hardly disconnected.

Taking out the heater wire

In the telephone cable, Four fine electric wires are covered with vinyl outer. Since fine electric wires are used for a heater wire, remove the outer vinyl cover, and take out wire inside.

Telephone cable (jacks are removed)
This is a telephone cable. Normally they are sold with jacks on each end. Sometimes discount telephone cable have no reinforcement nylon fiber and it is not suitable for heater wire.


The section of a telephone cable

removing outer cover
Fine four wire (Black,Red,Green,Yellow) is covered in the telephone cable. Take out them and use as heater wires.


Seam ripper
Using seam ripper, outer cover of a telephone cable can be opened easily and take out internal electric wire.

cutting outer cover‚­
Using seam ripper, cut the outer cover of telephone cable, be careful not to damage internal electric wire.

separeting wire and cover
After cut all the outer cover, separate outer cover and inner wires.

took out wire
separate inner wires to the four wire. From the 20 ft of telephone cable, we can get four 20 ft of heater wire.

Confirms the nylon fiber is inside

Normally, telephone cable includes nylon fiber to prevent disconnection. But some discounted cable have no nylon fiber, and it easyly be disconnected. Therefore removing the cover of wire, confirm nylon fiber is applyed inside.

removing cover
Using wire stripper, remove the insulation of wire.(How to strip)After the insulation is stripped, you can see twisted copper wire.

Confirm the nylon fiber
Rubbing the twisted copper wire with your finger, you can separate it into more fine several twisted copper wires. Rubbing the fine twisted copper wires, nylon fiber is appears from them. Since the copper wire is wrapped around the nylon fiber, even if the fiber is expanded by pulling hard, copper wire can change its shape as a spring, so it is not disconnected. If you can not find nylon fiber in the wire, the telephone cable can not use for heater wire, Because it is easyly disconnected.
Power cable

About power cable


PS/2 Keyboard/Mouse Extension Cable

Jack

Plug(built in the left foot)
Use the PS/2 Keyboard/Mouse Extension Cable for the power cable. This cable have a plug (with male contact) and jack (with female contact) on each ends.

Processing of a power supply cable

Cut the mouse extension cable near the plug, and connect heater plug side.

Cutting mouse cable


Cutting cable


Cut the mouse cable At 6 inch from plug tip, make two cable (plug side one is short, jack side one is long) Connect two heaters to the short cable (with the plug), and build it in the left foot of Cindy. Connect power supply unit to the long cable (with the jack), and connect it to Cindy's foot as a power cable.

Remove outer cover


Removing outer cover (How to remove) of each cut ends of the cable at the one inch from the end, expose electric wires inside.


After removing outer cover, you can see some fine electric wires. The numbers of wires and colors differ in each case.
In some case, you may find non-insulated wire in them. (shown in the bottom wire in the picture) Remove insulation (How to remove) of all these inside wires at 1/2 inch from the end, of both long cable and short cable. Divide these inside cable into 2 sets. In the picture, Black, Red, Brown and No-insulation is one set, and Orange, Yellow and Green is Another set. If wire number of each sets are nearly alike, you may divide any combination. However, you have to divide two (long one and short one) cables in the same combination. it is so important!.


Twist up each set of wire of long cable together by your finger.

Prepare crimping connector


This is crimping closed-end connector. Since connectors can be used under the high voltage of line, they have big skirts for insulation. Since Warming-Cindy is operated under small voltage of battery, cut off these skirts to make them small.


Cut off the skirts at the top end of them using snap-off cutter.


As shown in the picture, Cut them not to make metal pipe inside expose.


This is failure sample. If metal pipe in the connector is exposed, it can not use.

Heater with a plug

Assemble a "heater with a plug" by connecting short cable and two 10 ft heater wires. At first, cut the 20 ft heater wire (took out from the telephone cable) at the center, to make two 10 ft wires. In the picture, I use two different colored wire for explanation. but really their color is the same.


Confirm the length of exposed copper wire. When you insert the wire in the closed-end connector, exposed copper wire have to be just hidden in the connector. If copper wire is long and overflow out from connector, cut a little to make it hide in the connector.


Remove insulation (How to remove) at 1/2 inch from end.


Twist one of the divided set of wires of short cable (in the picture, Black, Brown, Red and Non-insulation) and heater together.


Insert twisted portion of wires into connector to the end of them.


Using crimper, crimp center of the metal pipe of connector strongly by your both hands.


Crimping the connector, the cable and the heater wire are connected as shown in this picture.


Cut the leading wire of thermal fuse shown in the picture. And crimp leading wire of thermal fuse and more one set of divided wire together.


Then crimp heater wire and thermal fuse together.


Bending the crimped portion of wire of cable and heater to the plug side, bind them with sewing thread together. Wrap the thread more than 10 turns and secure tightly and tie.


Bind the crimped portion of thermal fuse and wire of cable together with sewing thread


Bind two heaters and another side of thermal fuse together with sewing thread.


Work fray-stopper or glue on the bound portion.


Jack and heater is connected like this.


Wrap with the insulation tape. At first start wrapping from jack side, continue wrapping and reverse at the heater side. and finish wrapping at the started position. "Heater with a plug" is completed.

Inspecting continuity

Inspect whether the work was successfully done.


Turning function/range dial, select the smallest range of ohm-tester function.
In this function, the needle swings when two test probes are connected.


Insert plug (wrapped with the tape) into jack. Connect the test probes to each set of wire (in a figure, black, brown, red, no-insulation and orange, yellow green) at the end of cable. This inspection is success, if meter's needle not moves.


Connect the test probe to one set of wire (in a figure, black, brown, red, no-insulation) at the end of cable. another prove to the end of the heater. This inspection is success, if meter's needle moves.


Connect the test probe to one set of wire (in a figure, orange, yellow green) at the end of cable with the jack. another prove to the end of the heater. This inspection is success, if meter's needle moves.
Left shin

Connect power cable A plug is sewn in the left shin at the foot tip and the power supply cable is connected here. For this reason, the left foot is remade so that a plug can be built in.

Pattern and cutting

Warming-Cindy's pattern is almost the same as the ordinary Cindy's one except for left foot. Clicking following link, display the pattern (in an another window). Selecting FILE > PRINT on your browser's menu, print it on a piece of paper.
  1. Pattern for left shin (lower leg)
You may use this pattern to make dolls for your personal use or to sell at local craft shows and in limited quantities. However, I do require that you credit Cloth Dolls by doku@newon.org for the design on your hang tag or in any advertising that you do. You may not reproduce this pattern for sale or mass-produce dolls made from this pattern.


Cut out pattern and tape together.


Place pattern pieces on double layer of fabric and draw around with marker to mark fringe. The shape of the pattern in the picture above has some difference by subsequent improvement.


Pin and sew directly along the side line which shown in bold line on the pattern.


Cut out them, leaving a 1/4" seam allowance.


Turn the fabric over and place turned pattern on unmarked side. Matching edges of the pattern to the seam lines of fabric. And mark a top line.


Open the top and bottom. fold in the line which labeled "FOLDING LINE" on the pattern. Sew two darts on the bottom

Build in the "Heater with a plug"


Attach "Heater with a plug" to make the plug tip come at the tip of foot. The position to attach is shown in the picture above.


Insert the plug into the pipe portion of the shin.


Clip the seam allowance at the root portion of pipe. Be careful not to cut the thread.


Bind the plug over the fabric with thread more about 10 turns firmly and tie.


Work fray-stopper or glue on the knots.


Inserting plug portion into the shin, turn right side out.


The tip of a plug appears at the tip of a foot.

Stuff and close opening


Stuff uniformly around the plug, to keep plug at the center of shin. Turn in the seam allowance inside and sew a ladder stitch to the half of opening.


When sew to the center, turn the heaters to the already sewn side and continue stitching to close opening.


Pull thread to close opening. Make two small stitches and tie off. Two heaters exit from the center of the top.


"Heater with a plug" have been sewn up.


Confirm the jack can connect with the plug at the foot tip.
modifying shoulder joint

The shoulder joint of the Cindy is rotated 360 degrees. If heaters are built in here, they will be twisted and disconnected . In order to prevent this, Remove doll-joint and plastic washer from shoulder joints and sew up shoulder joint and a body together. Although a motion of a shoulder is restricted, structure becomes easier.

Mark sewing lines


both on the shoulder joint and the body, mark at the tangent of them. That is, the round mark is marked on the both the shoulder joint (ball of cloth), and the body. Moreover, meeting the arm with the body parallelly, mark a line as a tally (to resume the direction of arm).

Modifying shoulder joint


Take out the stuffing, Re-opening the opening of the shoulder joint.


Cut off the pin of doll-joint in the shoulder joint. Be careful not to cut the fabric.


If the pin is cut off, the shoulder joint will remove from the body.


Take out plastic washer from the shoulder joint.


Stuff again and sew ladder stitch to close opening.

Modifying body


Re-open the opening on the side of the body, take out doll-joint and plastic washer inside the shoulder-joint.

Sew up shoulder joint


Sew ladder stitch again to close opening.


Matching the mark, sew the body and body together, using ladder stitch.


After continueing ladder stitch around the joint, secure the thread softly and make two small stitch and tie off.

Modifying more one joint


Modify more one (other side) shoulder joint in the same way.

Bodkin

About bodkin

In order to insert heaters, bodkin is used. Although ordinary bodkin can be used, since it is a little short, we make long one from the steel wire.

Making bodkin

Please use a good wire. Since a wire of poor quality is hard to bend, work becomes difficult, and since it is easy to chop off, you may be injured during the work.


wire
Cut the 1 yd of steel wire.

straightening
Straighten the wire with your finger.

Bending
Bend the wire in the center.

Pinching with the pliers
Pinch the (non-bent side of) wire with the long nose pliers, and wrap the wire around the tip of pliers.

catch on the screw driver

Twisted wire
Insert the shaft of screw-driver into the loop of wire at the bent side. Stepping the pliers on the floor with your foot, and turning the screw-driver with your hand, twist the wire.

loop side
The loop which the screw-driver have been inserted, becomes the eye of bodkin to insert elastics (here we use heaters instead of elastics). Flatten the eye a little, with pliers.

Pinched side of the wire
Cut off the pinched portion. make a ring to make it safe as shown in the picture.

cleaning up

cleaned up
Since wire was stained in the manufacture, if use this bodkin for the doll, it will stain her. Therefor, wipe the bodkin strongly with the dry cloth or paper, to clean it.

Inserting heaters

Insert heaters into the doll Using bodkin. Although this work didn't looks familiarly, it is the same work as inserting elastic into casing of clothes.

Summary of this work


Heater layout(front view)
If the heater is not inserted uniformly, a hot portion and a cold portion will appear. Therefore, pass the heater uniformly as shown in the figure above. In the picture, green lines shows heaters. Two kind of heaters are running in the doll. One is the heater which runs in an arm (and body) and the another is the heater which runs in a leg (and body). The route of heater is almost the same at right and left. So, there are four heaters run in the doll. These four heaters are jointed serially together.

Insert heaters by the method shown below.
  1. Removing sewn thread, open front of the body
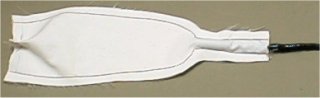
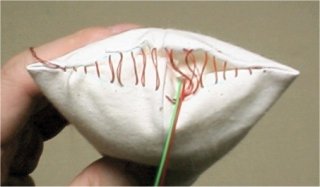
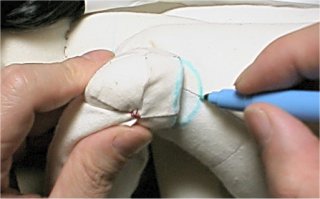
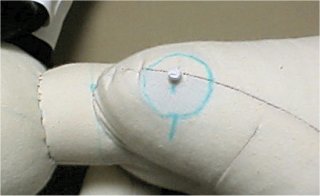
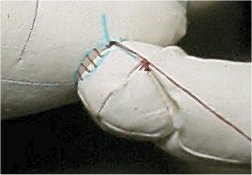
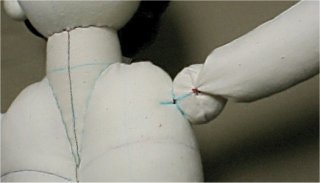
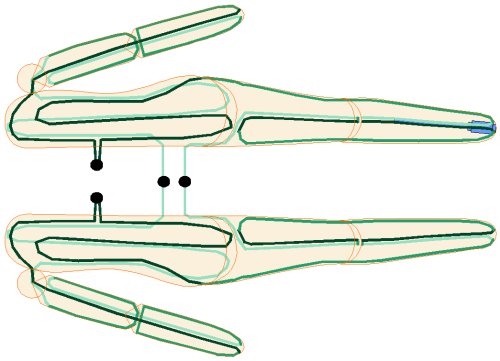
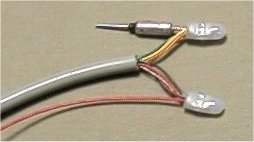
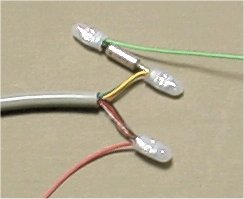
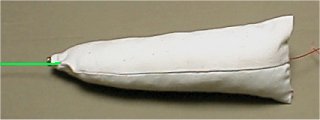
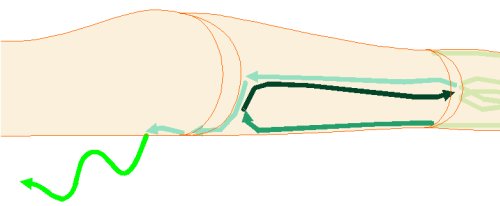
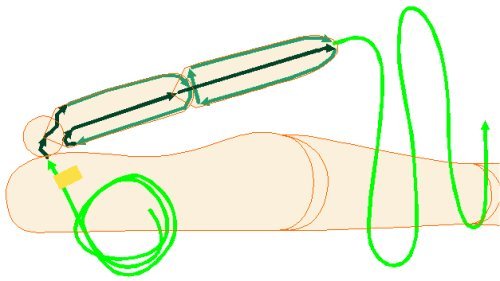
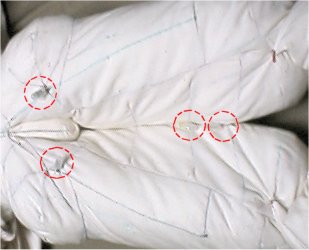
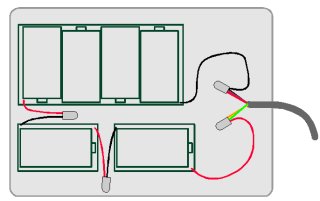
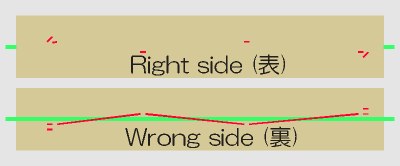
  2. Heaters comes out to the surface where both (left and right) bodies touched.
  3. Insert four heaters separately
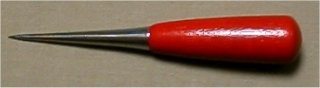
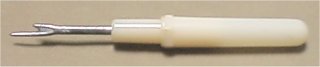
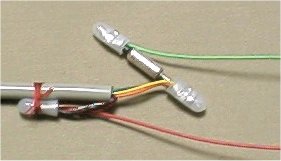
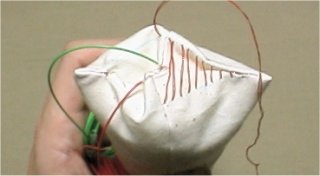
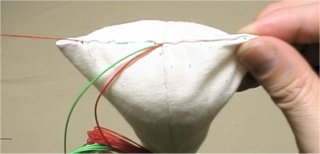
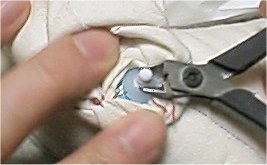
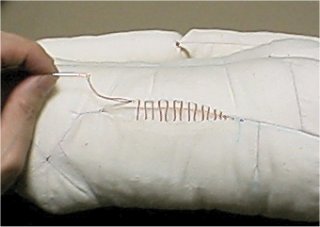
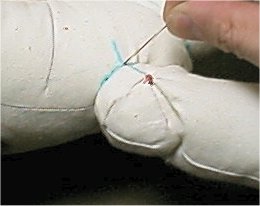
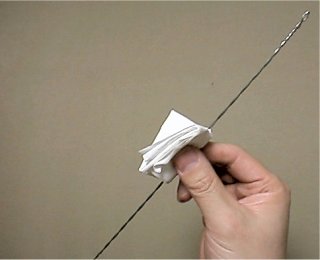
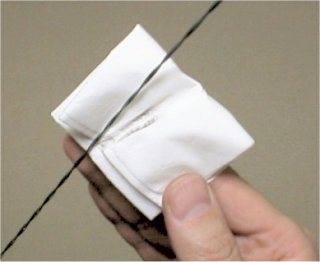
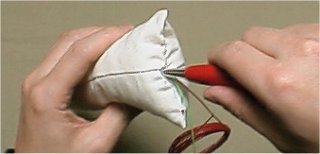
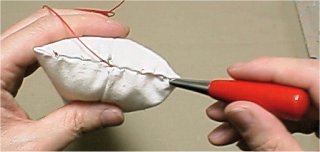
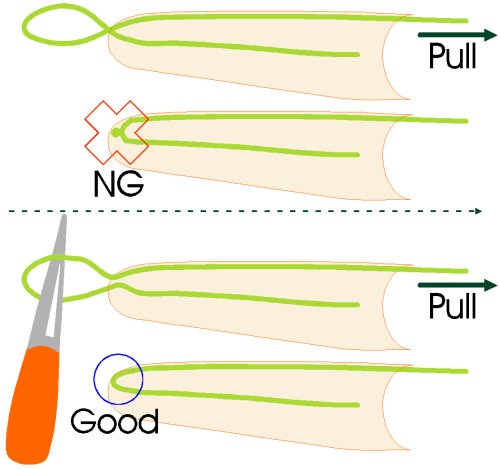
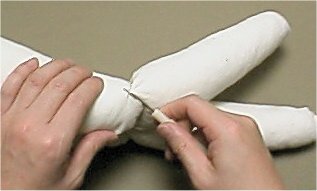
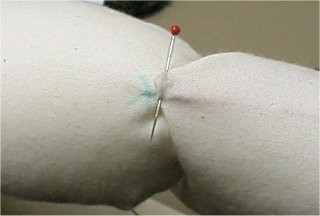
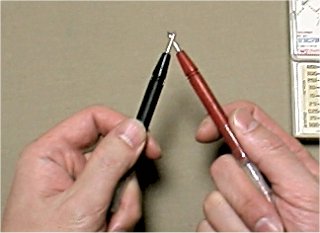
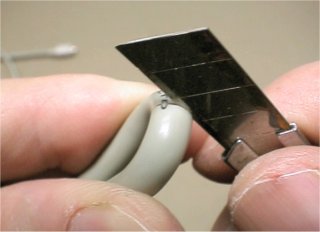
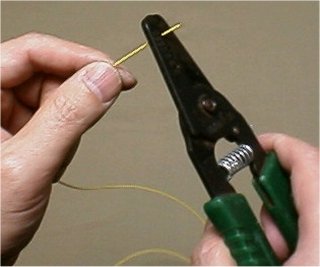
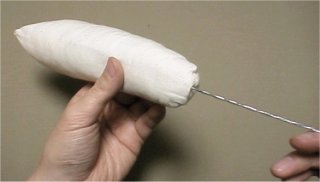
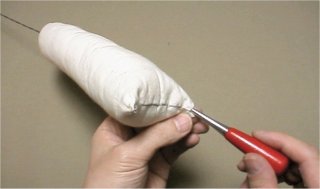
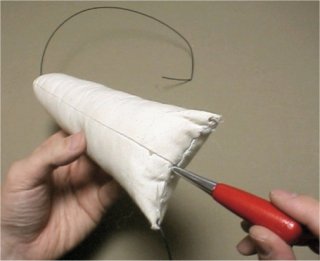
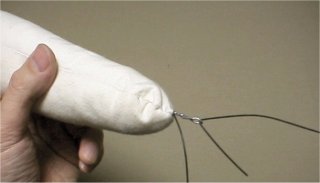
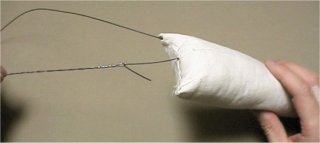
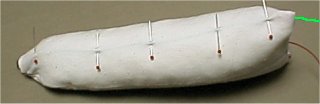
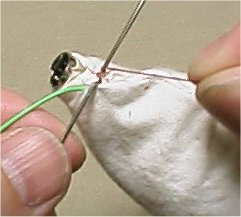
  4. Insert the heater with the bodkin
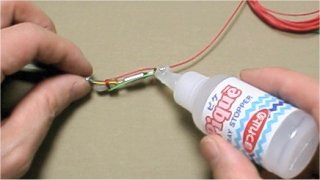
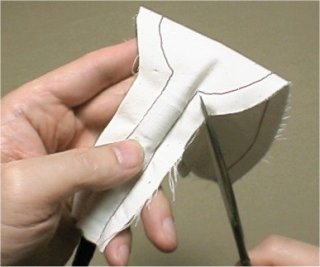
    To prevent the sifting of heater route, whenever insert with bodkin, sew and fix the heater with thread.
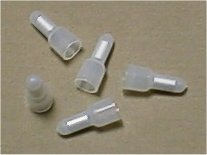
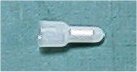
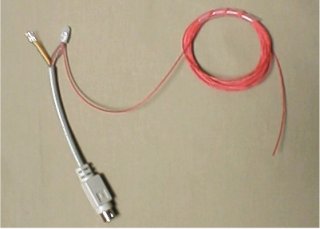
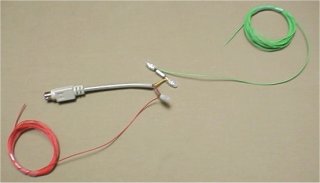
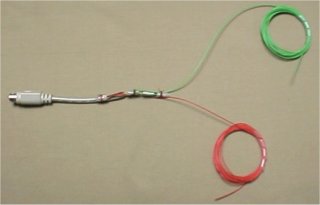
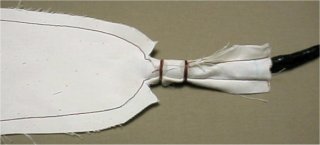
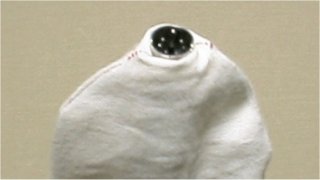
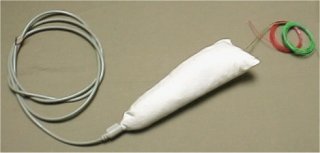
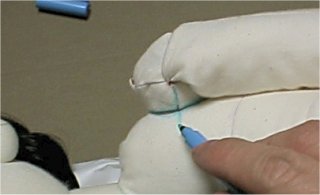
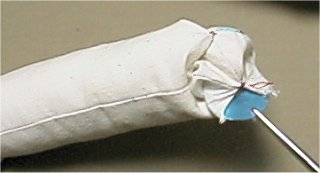
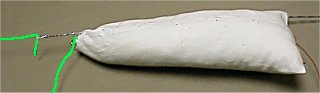
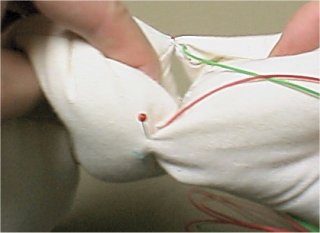
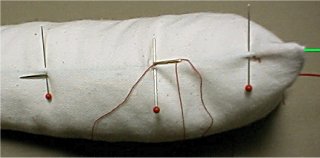
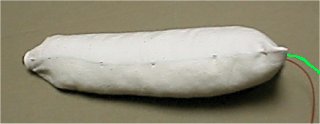
    Since left shin is built in a plug, the route of the heater differs from others.
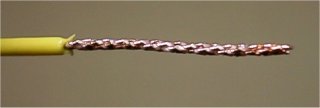
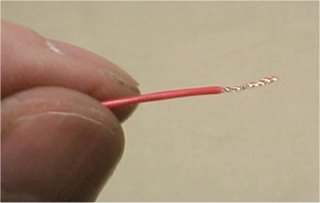
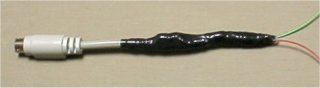
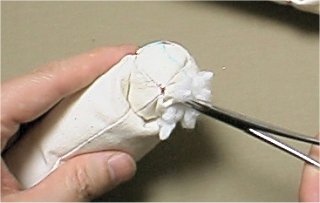
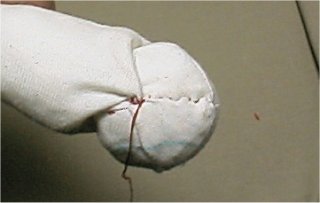
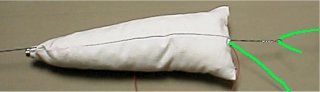
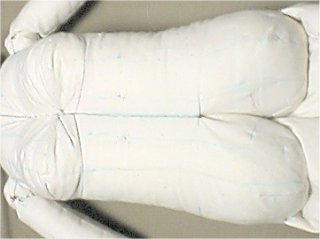
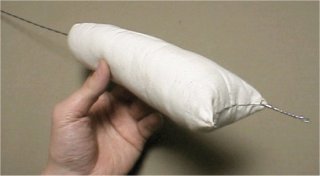
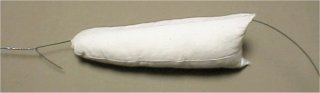
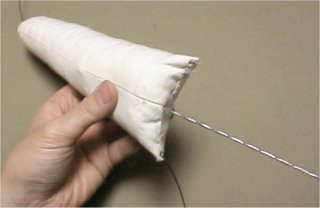
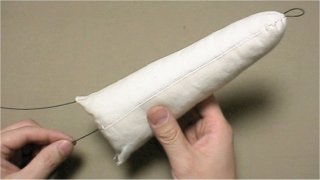
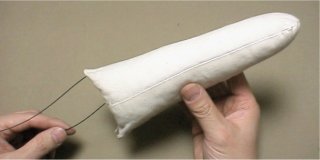
    Pass heater immediately under the cloth. So, heater passes between internal fiber and cloth.
  5. connect four heater serially
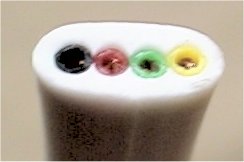
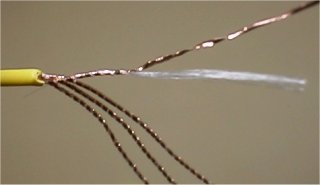
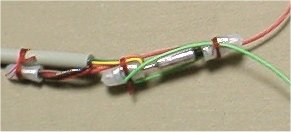
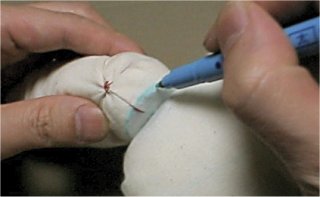
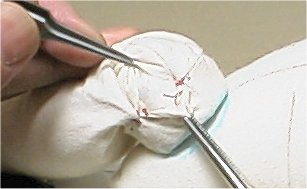
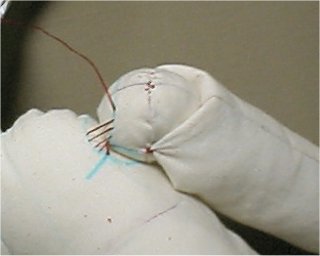
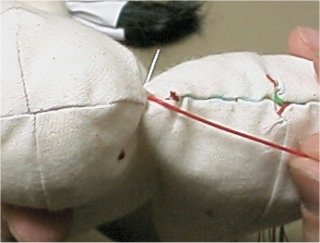
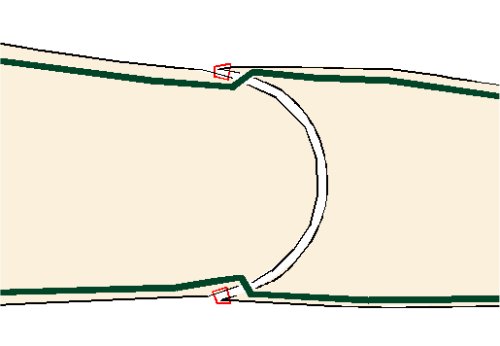
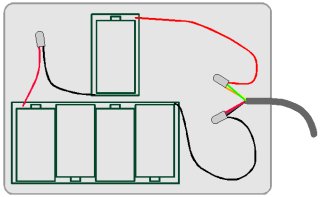
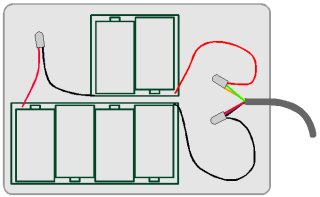
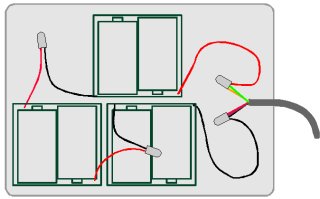
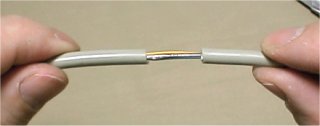
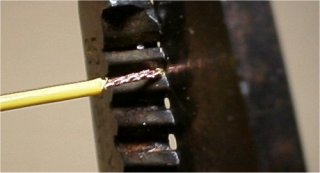
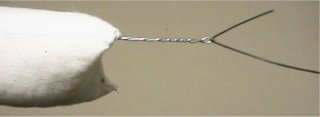
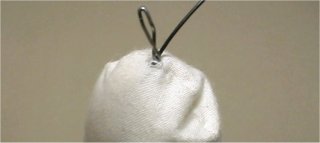
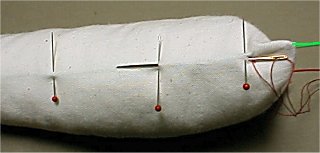
  6. connect four heater serially at the black round mark shown in the picture above.
  7. Sew close front of body again
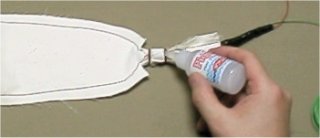
  8. Connection points of heaters are hidden in the closed portion of body.

Opening the body


Mark sewing lines
Mark the sewing line of front body, to sew close again after heater work finished. Remove sewing thread of front body with a seam ripper. Opening two (left and right) body, you can see the area where two bodies have touched. This area is called CONTACT-AREA in this instruction.

heater of left leg

Insert heater into the left leg by the instructions below.
  1. Insert heater which exits from plug into the left shin.
  2. Insert heater which exits from the left shin into left upper leg and body.

Inserting heater into the left shin


Two heaters which come out from the plug run in the left shin. In the picture above, dark (medium, light) green line shows the heater runs front (side, back) surface of the doll. The tip (with the triangle mark) of each arrow shows the exit (position which inserts bodkin) of a heater, and the back end (which does not have a triangle mark) of an arrow shows the entrance (position which bodkin exits) of a heater.


To prevent disconnection, pulling the leg and making heaters draw into the leg, slack the heaters.


Hole at the exit of heater with awl.


Hole at the entrance of heater with awl too.


Insert a bodkin into the exit hole for heater. Continue inserting bodkin, keeping tip of it sliding on the wrong side of the fabric. Exit bodkin at the entrance hole for heater. Insert the heater into the eye of the bodkin. In the picture above, green heater is inserted into the eye of bodkin (which inserted left to right).


Pulling out the bodkin, insert the heater through the front of shin, from top to bottom. To prevent disconnection, slack the heater a little. Sew and fix the heater with thread.(How to sew heater)


Hole the next exit of heater. next exit is inside of 1/2 inch from the tip of top end.


Insert a bodkin into the hole. Continue inserting bodkin, keeping tip of it sliding on the wrong side of the fabric. Exit bodkin at the hole where you previously drew out heater. Through the end of heater into the eye of the bodkin. In the picture above, green heater is inserted into the eye of bodkin (inserted right to left).


Pulling out the bodkin, insert the heater through the side of shin, from bottom to top. Heater forms a loop at the foot tip. Pulling more, the heater loop becomes smaller. Pulling more, the heater loop disappears in the foot tip. Stop pulling the heater at this moment.


At this time, the heater may bend like the example shown in the picture below as "NG". In this case, the heater may disconnect at this bent portion. To prevent this, Pull the heater, supporting the loop with a awl not to make it be twisted, shown in the picture as "GOOD". To prevent disconnection, slack the heater a little. Sew and fix the heater, not to make the heater shift.(How to sew heater)


In the same way, insert another heater which comes out from the left shin (shown as a red line in the picture). At first insert heater into back of leg from top to bottom. Then insert heater into side (which has not been inserted yet) of leg from bottom to top. Sew and fix.

Heater of left leg and body


Heater of left leg
Heater runs in the left leg as shown in the picture above. In the picture, dark (medium, light) green line shows the heater runs front (side, back) surface of the doll. Since the plug is built in the left shin, the route of the heater differs from other one. Start inserting two heaters (were coming out at the top end of the left shin) from the joint portion of bottom of upper leg. One heater passes through the upper leg, the front body, and exits at the front upper portion of CONTACT-AREA. Another heater passes through the upper leg, the body (a little), and exits at the back lower portion of CONTACT-AREA. Insert the heater of left leg by the following procedure.
  1. Remove the left side shin
  2. Sew up the newly sewn left side shin with the plug
  3. Insert the heater (which is coming out from left side shin) into the upper left leg and the body.

Remove left shin


Using a seam ripper, cut the thread at the joint, to remove left shin. Mark the sewn point of joint, to sew up again.

Sewing up left shin


Pin on two top corner of shin (with plug) to the upper leg at the marks.

Heater route
This time, the heater doesn't run under the pin, but it bent to inside.


sew up shin to upper leg at the pined up position.


sew up the shin to the upper leg, near the pin.


sewn up shin.

Insert heater into the left leg and front of body


Front view
Lay down Cindy on her back. At first, insert the heater (was coming out from right side of left shin) into inner side of upper leg, from bottom to top. Then insert the heater into front of upper leg, from top to bottom. Then insert the heater into back of upper leg, from bottom to top. Passing through a hip joint and the body, exit at the lower back portion of CONTACT-AREA.

Front view
Lay down Cindy on her back. Insert the heater (was coming out from left side of shin) into outer side of upper leg from bottom to top. Passing through a hip joint and the body, exit at the upper front portion of CONTACT-AREA.

Heater route in the joint
Pass the heater in the joint as shown in the picture above. For example, the heater which came out from the inner side of upper corner on the shin (right side of a figure) is inserted into upper leg (left side of figure) at the bottom of it. since the heater runs near the seam of joint, (Even if the joint bends) it will not be pulled strongly.

heater of right leg and body

Heater route of right leg is almost the same as left leg. But since right leg has no plug, work procedures differ.

Insert heater into right leg


Front view
In the picture above, dark (medium, light) green line shows the heater runs front (side, back) surface of the doll. The tip (with the triangle mark) of each arrow shows the exit (position which inserts bodkin) of a heater, and the back end (which does not have a triangle mark) of an arrow shows the entrance (position which bodkin exits) of a heater. Mark the center of heater (10 ft from the end) with the tape. Start inserting from top of upper leg (inner side near the hip joint seam). Pulling the heater until the tape comes to near the hip joint. Continue inserting through as shown by the arrow in the picture. Exit heater at the lower back portion of CONTACT-EREA.

Insert heater into front body


Front view
Remove the tape (for the mark of center) from heater. Inserting the heater into the front body as shown in the picture, exit it at the front top portion of CONTACT-EREA.

Heater of arm and back body

The heater in the arm and the fromt body is symmetrical. Here, only right side is explained.

Insert heater into arm and back body


Back view
In the picture above, dark (medium) green line shows the heater runs front (side) surface of the doll. The tip (with the triangle mark) of each arrow shows the exit (position which inserts bodkin) of a heater, and the back end (which does not have a triangle mark) of an arrow shows the entrance (position which bodkin exits) of a heater. Mark the center of heater (10 ft from the end) with the tape. Lay down Cindy face side down. Start inserting from body side of the shoulder joint to seam of shoulder joint. Pulling the heater until the tape comes to near the entrance of heater. Continue inserting as shown by the arrow in the picture. Exit heater at the tip of the hand.

Front view
Lay down Cindy on her back. Insert the heater which exits at the hand tip into front of the arm, shoulder joint, front of the body, and exits at the front top portion of CONTACT-AREA.

Vack view
Lay down Cindy face side down. Insert the heater which exits at the shoulder joint into front of the body, and exits at the back middle portion of CONTACT-AREA.

Connecting heaters

Serially connect four heaters sewn in on the body.

Preparation of connection

To prevent heater disconnection, slack the heater in the body. Therefor, pulling arms and legs, to make draw heaters into the body. Then cut heaters at 1" from body.

Connection


Connection of heater (front view)
Serially connect four heaters (How to connect) at three black dots in the picture. Please connect certainly, checking the next table, since current does not flow or will short-circuit, if you mistake connections.
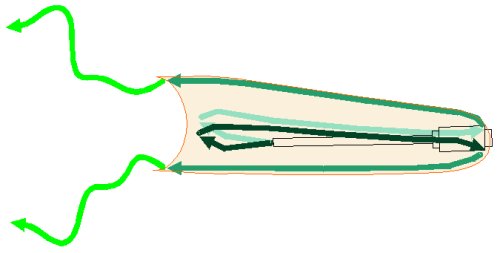
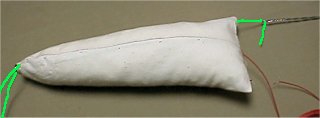
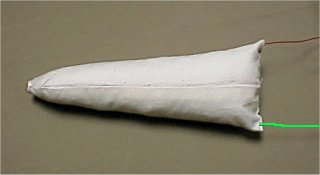
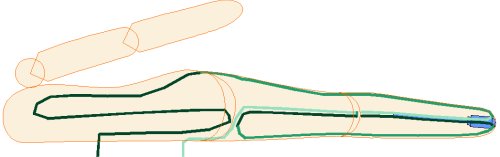
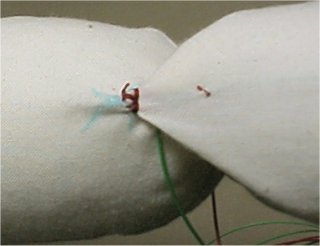
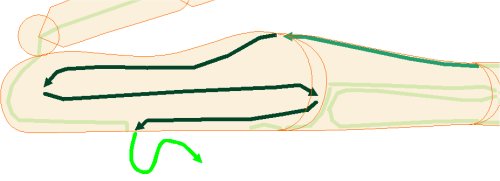
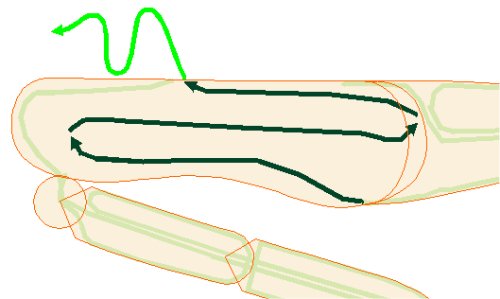
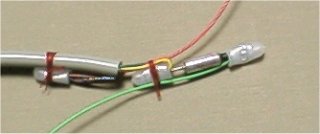
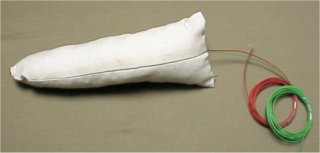
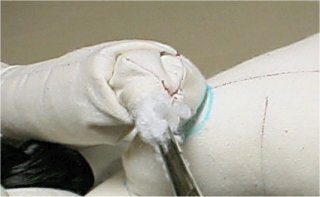
  1. from left leg > front body > exits at front upper of CONTACT-AREA
    and
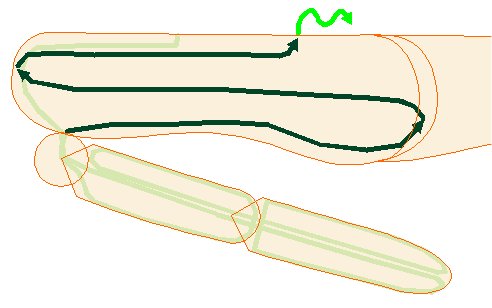
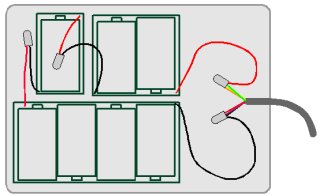
    from left arm > fromt body > exits at front upper of CONTACT-AREA
  2. from right leg > front body > exits at front upper of CONTACT-AREA
    and
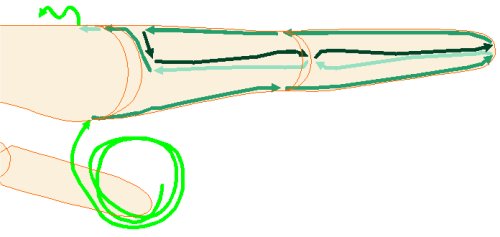
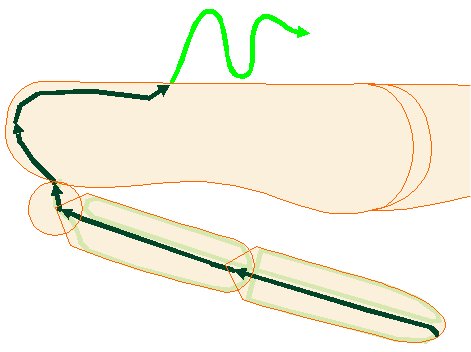
    from right arm > fromt body > exits at front upper of CONTACT-AREA
  3. from right arm > back body > exits at back middle of CONTACT-AREA
    and
    from left arm > back body > exits at back middle of CONTACT-AREA
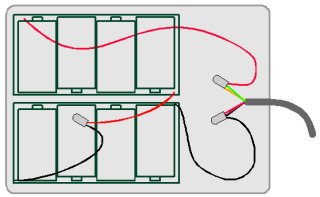
  4. from left leg > exit at back lower of CONTACT-AREA
    and
    from right leg > exit at back lower of CONTACT-AREA
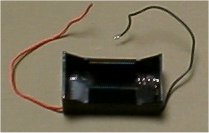
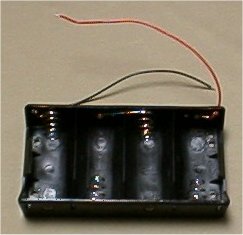
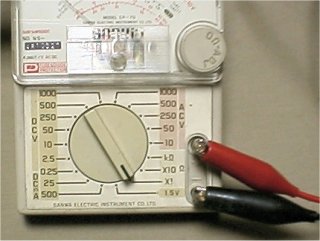
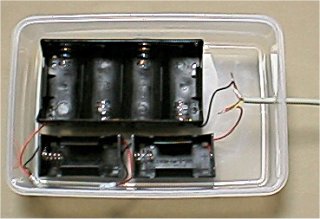
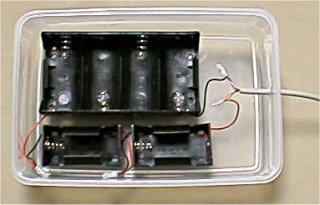
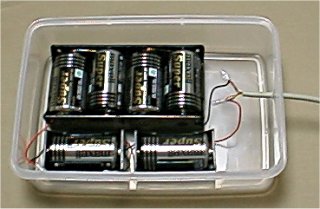


Connect at the red round mark shown in the picture.


Close up picture of connection.


After connecting heaters, sew ladder stitch and close front of body again. CONTACT-AREA is hidden inside of the body.

Battery

Measuring resistance of the heater

Even if you work similarly, the heat generation amount differs by the type of heater. In order to obtain suitable heat generation amount, measure the resistance of a heater and determine the number of a battery based on this.


set your multimeter's range/function dial to smallest ohm range.


In this setting, if you contact two test probes together, needle of the meter will swing fully.


Keeping test probes contact certainly, turning the zero-ohm-adjustment-dial, make the needle to points 0 ohm.


Connect power cable to left foot of Cindy. Certainly contact probes to the each set of wires at the end of the power cable.


Read the value indicated on the ohm scale. In the picture, the needle points 10 ohm.

Number of battery

Using the table below, get the number of battery from resistance of the heater.

resistance vs number of battery
resistance
(ohm)
supply voltage
(volt)
number of battery
5.0 6.3 4
5.5 6.6 4
6.0 6.9 5
6.5 7.2 5
7.0 7.5 5
7.5 7.7 5
8.0 8.0 5
8.5 8.2 6
9.0 8.5 6
9.5 8.7 6
10.0 8.9 6
10.5 9.2 6
11.0 9.4 6
11.5 9.6 6
12.0 9.8 7
12.510.0 7
13.010.2 7
13.510.4 7
14.010.6 7
14.510.8 7
15.011.0 7
15.511.1 7
16.011.3 8
16.511.5 8
17.011.7 8
17.511.8 8
18.012.0 8
18.512.2 8
19.012.3 8
19.512.5 8
20.012.6 8

Using formula below, get supply voltage
Supply voltage (v) = SQRT( 8 (w) * resistance (ohm) )


Connecting power supply

Assemble a power supply unit. In the unit, battery holders are serially connected to the power supply cable. Since the number of a battery differs with the type of heater, the number and kind of battery holders also differ by each Cindy. Some examples for connection are shown in the picture below.

for 4 batteries
This is example for 4 batteries, using battery holder for 4.


For 5 batteries
This is example for 5 batteries, using battery holder for 4 and 1. When using two or more battery holders, + wire (in many cases red) and - wire (in many cases black) of a each battery holder are connected together.

For 6 batteries
This is example for 6 batteries, using battery holder for 4 and 2.

For 6 batteries
This is example for 6 batteries, using battery holder for 4 and 1.

For 6 batteries
This is example for 6 batteries, using battery holder for 2.

For 7 batteries
This is example for 7 batteries, using battery holder for 4, 2, and 1.

For 8 batteries
This is example for 8 batteries, using battery holder for 4.


Using an awl, hole the side of the food keeper, a little larger than the diameter of power supply cable.


Insert power cable into the hole after pulling out the awl. After about 1 minute, the hole is shrunk small, and a power supply cable is firmly fixed to the food keeper. Pulling power cable, confirm it does not escape.


Arrange the battery holders in the food keeper.


Taking out battery holders from food keeper, Arrange them on the table as they were arranged in the keeper. Cutting wires of battery holders as shown in the picture, strip (How to strip) and twist together serially.


Inserting the twisted portion of wire into the hole of closed-end connector, crimp (How to crimp) them.


Tack mounting Tape back of battery holders. In some case new battery holder and food keeper may be stained with oil. If so, mounting tape can not paste up. Therefore wipe them with lighter fluid etc.


Removing release paper of mounting tape, stick the battery holder on the bottom of the food keeper. Twist the two electric wires which come from the battery holder of both end, with the each two set of wire on the power cable together as shown in the picture. You may twist which group of wire on the power supply cable with the red wire of a battery holder.


Inserting the twisted portion of wire into the hole of closed-end connector, crimp (How to crimp) them.


Covering food keeper, power supply unit is completed.
Inspection

Since if some errors are in your work, batteries and a heater may be overheated. Check the normal operation by "step by step" inspection as described below.


Being careful for the direction, set batteries in the holders. Touching the batteries, wait for 1 minute. It is success if a battery does not get warm at all.

Connect power cable to Cindy
Connect the power cable to the foot of Cindy. Touching the batteries, wait for 1 minute. It is success if a battery does not be overheated (in this case, Since Cindy is operated, battery may get warm a little).

Lay Cindy on a bed
Keeping connecting the power cable, Lay Cindy on the bed and cover her with the bedding. Touching the batteries and each part of Cindy, wait for 5 minutes. It is success if a battery and any part of Cindy does not be overheated (this time Cindy does not get warm yet).

Keeping laying on the bed, and touching the batteries and each part of Cindy, wait for an hour. It is success if Cindy's each part have got warm like an human body.


Removing batteries from holders, inspection have been completed.
Completed!

Congratulation! your "Warming-Cindy" now completed.


Detailed work methods

To remove outer insulation


Bending the cable
pinching the cable with your finger to bent acutely.


Breaking the cover
Applying the edge to the outer part of bent portion, break the outer cover. Be careful not to damage inner electric wires.

Breaking the cover
Break the outer cover little by little.


Bending in the reverse direction
Bend the cable in the another direction.

Breaking the cover
Applying the edge to the outer part of bent portion, break the outer cover wholely.


Pulling out cover
Pull and remove the outer cover.

Removed
Confirm inner wires aren't damaged.

How to remove insulation


Choosing a slot
There are various sizes of slots on the edge of wire stripper. Chose a slot which can remove insulation without damaging copper wire inside. In the picture, 0.5 mm slot is used.

Pinching wire at the slot
Pinch the wire with the chosen slot on the edge of wire stripper.

Pull and remove insulation
Pull the wire slowly and remove the insulation.

Removed
If insulation is removed, copper wire will appear. check the copper wire is not damaged.

How to crimp

Crimp and connect the wires as described below.

Remove the insulation
Stripping the insulation (How to strip) 1/2" from the end of wire, expose copper wire inside.

Insert into connector
Insert the exposed copper wire into the connector. Be careful not to overflow the copper wire from the connector.

Inserting

Pinching position

Pinching strongly
Pinching strongly at the center of metal pipe in the connector, crimp the wire.

Crimped
Wires are crimped

How to insert the heater

I explain inserting process using shin (removed from body). But really almost all heaters are inserted into the assembled Cindy.

Holeing at the exit of heater
Using an awl, hole (in which the tip of bodkin can pass through) at the exit of the heater. Gradually, this hole becomes small and will be closed.

Inserting a bodkin
Insert a bodkin into the exit hole for the heater. keeping tip of bodkin always touching to wrong side of fabric, Continue inserting.
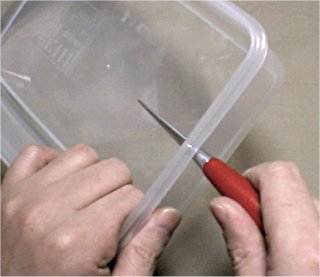
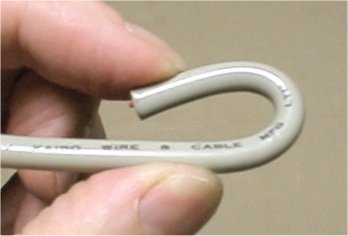
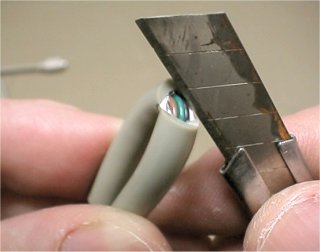
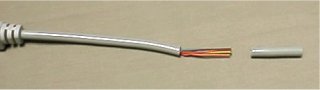
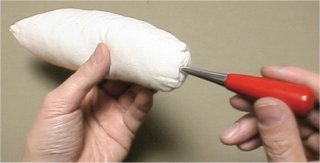
Thus, heaters are passed immediately under the cloth, that is, heaters passes between fiber and cloth.
Then exit bodkin at the entrance hole for heater.

Holing at the entrance of heater
Using an awl, hole at the entrance of the heater like the exit.

Exit the tip
Exit the tip of bodkin at the entrance for heater.

insert the heater into eye
Insert the heater into the eye of the bodkin.

insert the heater into the doll
Slowly pulling out bodkin, Insert the heater into the doll.

Holing at the next exit
Using an awl, hole again at the next exit of the heater.

Insert a bodkin
Insert a bodkin into the exit hole for the heater (Newly holed) and exit it at the entrance hole (an awl have been pulled out). keeping tip of bodkin always touching to wrong side of fabric, Continue inserting.

Exit the tip
Exit the tip of bodkin at the entrance for heater.

insert the heater into the eye
Insert the heater into the eye of the bodkin.

insert the heater into the doll
Slowly pulling out bodkin, Insert the heater into the doll.

pullng the loop
Pulling out the bodkin, route the heater through the doll. Heater forms a loop near the entrance hole. Pulling more, the heater loop becomes smaller.

Inserted
Pulling more, the heater loop disappears in the foot tip. Stop pulling the heater at this moment. After inserting heater, sew and fix the heater as shown below not to shift.

How to fix the heater


Sew and fix the inserted heaters lightly not to shift. In the picture above, Green line shows the heater, red line shows sewing thread. Sew according to the following explanation.
  1. Make two small stitches near the entrance of heater
  2. Insert a needle along the heater, passing the needle to cross the heater under it, exit needle about one inch ahead
  3. insert a needle again near the exit of it.
  4. Insert a needle along the heater, passing the needle to cross the heater under it, exit needle about one inch ahead
  5. Repeat this process to the exit of the heater.
  6. Slack the thread to fix heater softly.
  7. Make two small stitches near the exit of the heater and tie off
Since the position of a heater may not be so exact, you may work this process roughly.


Let's explain an actual work below. At first, Pin the heater immediately under the cloth to make work easily. In some case you may work without those pins.


Make two small stitches near the entrance of heater. Insert a needle along the heater, passing the needle to cross the heater under it, exit needle about one inch ahead.


Insert a needle again near the exit of it. Insert a needle along the heater, passing the needle to cross the heater under it, exit needle about one inch ahead. Repeating this process to the exit of the heater to fix the heater.


At the exit of heater, Slacking the thread, make two small stitches and tie off


Heater is sewn and fixed. In the picture, red thread is used to show the sewing process. but really use the thread matches the fabric.
    If you like, you can place a link to this page. Use button picture below.

    About DOKU

      EMAIL (doku@newon.org)

      The "DOKU" does not mean a doctor. "DOKU" originates in the Japanese word "DOKUTOKU", and it means unique and original.