Makeover Creative ZEN MX (16GB)
For eternal playing/charging
A simple Litum ion battery cell charger
Eternal playbacking system
ZEN MX can't charge when playing
Creative ZEN MX is a cheap and large capacity music player. But it can not charge when playing. Since it get into file transfer mode when connected to the USB port to charge. So I have to stop playing when chage it. I wanted to charge it when it is under playing to enable endless play.
ZEN MX can't charge with ease
A Litum-ion battery cell is implemented in ZEN MX. The cell is difficalt to charge. Litum-ion cell's charging voltage and current must be controlled accurately, or it takes fire with ease.
Endless playing/chaging circuit
I designed a circuit for ZEN MX to charge under playing. The circut performs constant current and constant voltage charge.
To limit charging voltage up to 3.9V this circut prevent battery from fully cherged. Since Litum-ion battery shorten the life under fully charge. Maximum battly life is get from half charged condition. But most charger charges it up to 4.2V to get 100% capacity. But my charger requires longer battery life instad of the large capacity. Because it is always operated by commercial power. (Of course I can teke out ZEN MX uncoupling this charger and get continuous 15 hour of playing by half battery capacity. It is quite enough for a day isn't it?)
This charger charges with 100mA (0.2C) constant current. ZEN MX use approximately 50mA current to play music with dispay back light. So this charger can charge under playing and actualize endless play.
Behavior of the circuit
At first this charger starts 100mA constant current charging. Battery voltage is increase over time. And when it runs up to 3.9V, constant current chaging ends and 3.9V constant Voltage chageing starts. In constant voltage charging, charging current is gradually decrease. And at the end, charging current is stopped even the charger is attached and runing.
WARNING!
If your charger fails, ZEN MX's internal battly will TAKE FIRE and/or BLOW UP. Every Li-Ion charger have risk of TAKE FIRE and/or BLOW UP. Take full responsibility for your actions.
DO NOT operate this charger when the battery is empty or hot. Since this charger have no pre-charge check and temperature sense function.
Turn off ZEN MX when plug and unplug power supply. Since when charger starts, voltage become unstable for a moment.
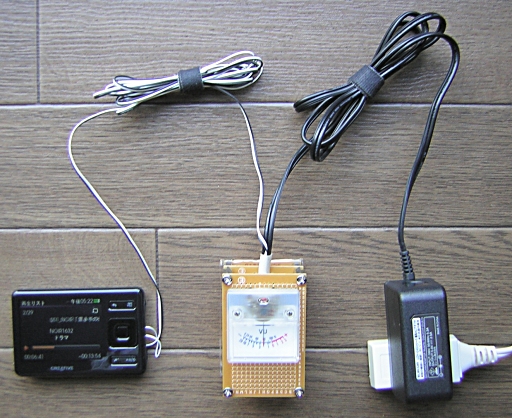
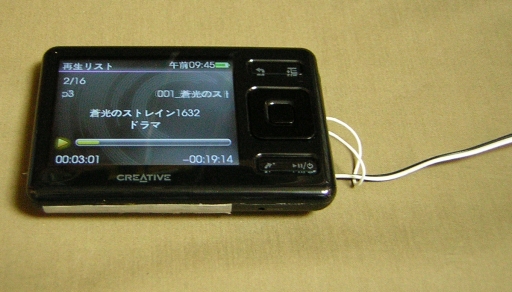
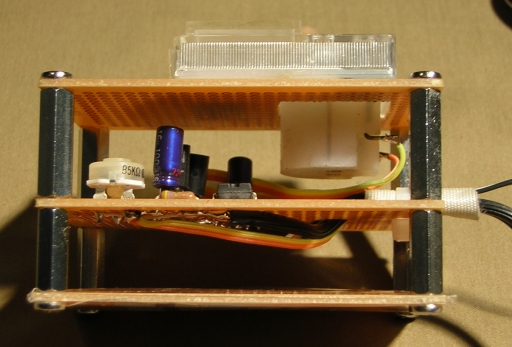
Full view
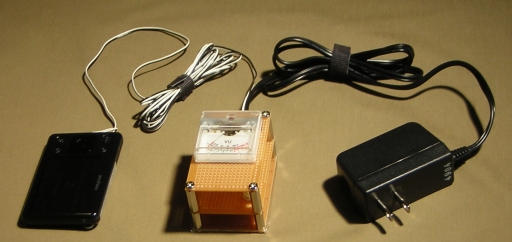
Full view of this eternal playing system
This sysytem consisted of a ZEN MX, a charger and a power supply. a charger have a current indicator. ZEN MX is Altered to make an electrical connection to the internal battery. I use a power supply for a USB HUB (5V 2A ratings). Supply voltage have to be regulated and the voltage drift have to be less than 2%. Since Li-ion battery requires correct voltage for constant voltage charging. At least 200mA of maximum current rating is required for power supply.
Making a connection to the battery
Remove the back half like this or this. And make two electrical connections to the internal battery using electrical wire by soldering. (You can see white and black one in the picture below). DO NOT CONTACT BATTERY WIRES to any other circuits or conducting body, ex. printed patterns, wires, chassis, your tools. Or ZEN MX will DIE at the speed of light. Here do every thing very very carefully like a difficult surgical operation. Hole the back half at the connected porton like a permanent stoma on the human body.
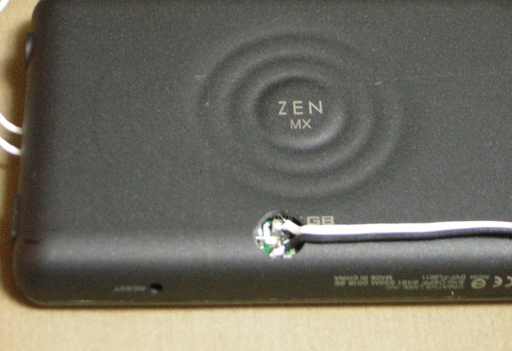
An access hole on the back half
Tape the hole to fix the wires. Use high-quality tape (ex. glass cloth adhessive tape) to avoid sticky dirt.
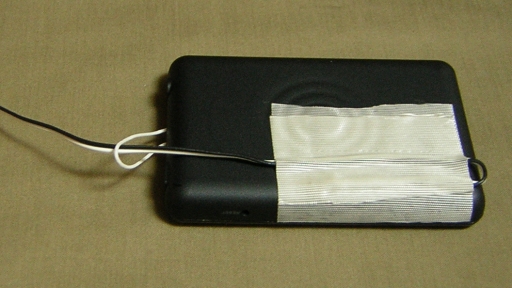
Tape to fix the wires
Power On ZEN MX and check the operation. If not works be quick to give it up, your MX is already died. Since I was adready remove back half, I added a strapping wire to dangle MX.
Runing ZEN MX
Schematic
You can see the schematic of this charger below. LM324 operational amplifier controlls C2655 transistor and perform precision constant voltage charging. C1815 transistor senses the voltage of R4 and perform constant current charging to control the base current of C2655. C1 reduces AC gain to avoid oscillation. D1 protects circuit when power downs. Adjust Charging voltage with VR1 and indicator swing with VR2.
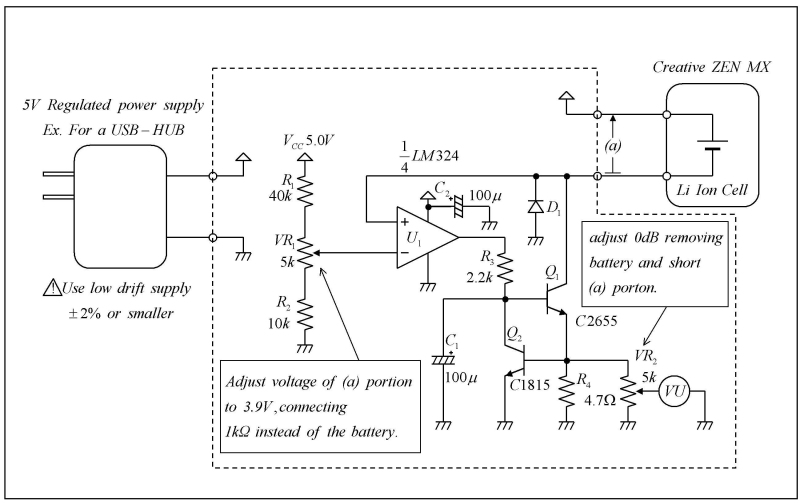
Schematic of charger
Assembling
Assemble the circuit on the small univasal printed circuit board. Hole the PCB and through the wires in to the hole to avoid disconnection at the soldering portion((1) in the picture). Hole the PCB and tie cable to fix them((2) in the picture). Cut out square hole and attach indicator with both side adhessive tape((3) in the picture).In this model VR1 is omitted.
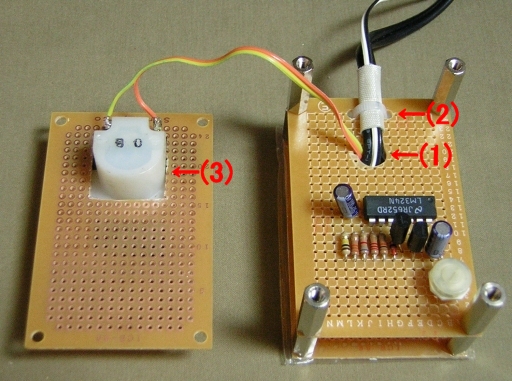
Hole on the PCBs
Assemble the PCB with eight threaded spacer and threads.
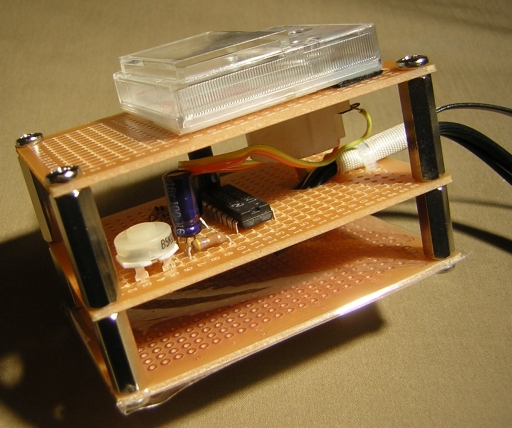
Assemble of PCBs
Back side PCB implements NO parts, It covers solder side of the center PCB. Front side PCB inplimets indicator only and it constructs the front panel.
Three PCBs
Adjustment
Before conccecting battery, connect additional 1kOHM resistor at (a) portion on the schematic. Insert a power supply into a socket. Turn VR1 and adjust voltage between both ends of 1kOHM to 3.9V using digital voltmater.
Then remove 1kOHM resistor and short (a) portion with wire. Turn VR2 and adjust indicator swing to 0dB(100%).
Remove wire to short (a) portion, and connect cables from battery in the ZEN MX VERY VERY CAREFULLY. DO NOT short battery wire. Or battery will teke fire or blow up or die.
Run
Under the playing of the file in the SD card memory, Current indicater swing to 70% and pulsatile once in the second when MX reads the SD card. movie
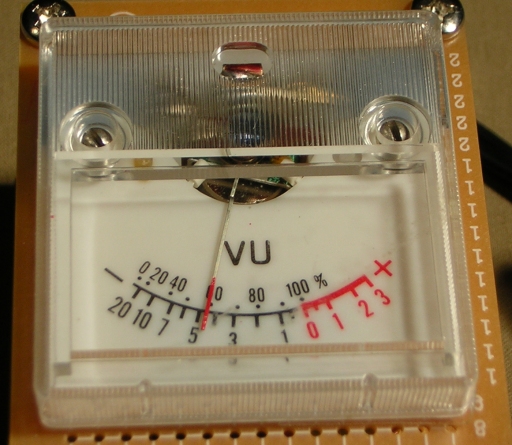
Indicator swing
Battery indicator shows 70% afterr 100 hour of continus playingback.

Battry indicator keep 70%
Eternal playing can be actualized. My ZEN MX keeps 2400 of anime story sound tracks. It requires 1000 hour (42 days) continus runing for entire playback.
Eternal playing